|
#121
 10-16-2017, 08:18 PM
|
|||
|
|||
|
Quote:
Thanks for the comlpiments, but ALL the credit is due Stein for open sourcing his build STL (the file type that the 3D printer reads) files! I've taken his ideas, & added my own twist/spin/optional parts etc., to it to make it my own. 
|
|
#122
10-17-2017, 06:20 PM
|
|||
|
|||
|
Today, due to weather it was a very short day at work!
 Nothing wrong with that once in a while. I took advantage of the time to tinker in the garage a bit. Since I still don't have the parts Nothing wrong with that once in a while. I took advantage of the time to tinker in the garage a bit. Since I still don't have the parts  for the D5, I worked on the 574 Front End Loader a bit. I soldered the leads to the drive motors, & got the rear axle mounted on the model. for the D5, I worked on the 574 Front End Loader a bit. I soldered the leads to the drive motors, & got the rear axle mounted on the model. 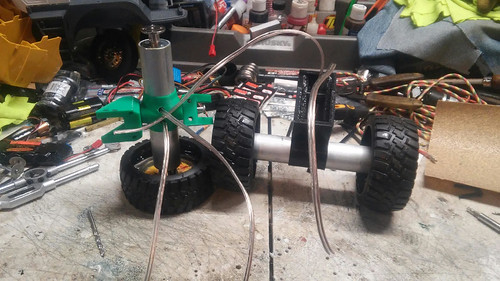 unnamed (21) by Anthony Kalnoski, on Flickr unnamed (21) by Anthony Kalnoski, on FlickrMy axles are now 1/2 an inch wider then the stock axles. I wasn't anticipating this when I started this project.  Due to the lead I added into the rims, & wanting to make sure it was WELL sealed, I the epoxy work I did was a little too much. Due to the lead I added into the rims, & wanting to make sure it was WELL sealed, I the epoxy work I did was a little too much.  No worries, I'm still going to run them. I've too much time invested in them to NOT use them. No worries, I'm still going to run them. I've too much time invested in them to NOT use them.I would have liked to got more did today, but I couldn't. When I got home to start on the project, my drill had a dead battery. I plugged it in, before I started the soldering work. By the time I got everything out to solder, & performed the task, the drill had a lil charge to it. It had just enough charge that I could drill the holes in the stock rims, as well as the ones in the bottom of the model for the mounting holes. I know the bolts that hold the assembly to the model are horrendously long & hideous looking. I SHOULD have used between a 27mm to 30mm long m4 bolts, but I've misplaced them.  I was ONLY able to find the 35mm long bolts that I used. I tried to cut them off with a pair of dikes, but CAN'T get far enough back in the jaw of the tool to get proper leverage to make the cut. I was ONLY able to find the 35mm long bolts that I used. I tried to cut them off with a pair of dikes, but CAN'T get far enough back in the jaw of the tool to get proper leverage to make the cut.  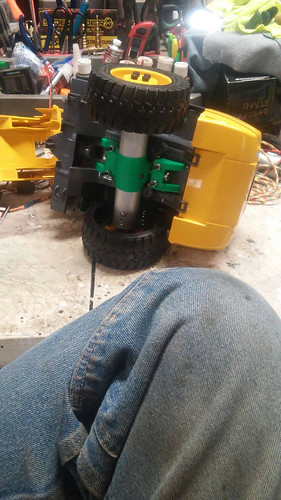 unnamed (22) by Anthony Kalnoski, on Flickr unnamed (22) by Anthony Kalnoski, on Flickr
Last edited by skeeter; 10-17-2017 at 11:43 PM. Reason: forgot to add ALL the photo's, & typo's
|
|
#123
10-17-2017, 06:25 PM
|
|||
|
|||
|
I would like to still be out in the garage tinkering, but it's a cold dreary day & the garage is unheated. I'll just have to sit inside, & look at the previous posts on here. Now that my brother got that photobutt thingy installed to fix it so I can see the pics again!

|
|
#124
10-17-2017, 06:42 PM
|
|||
|
|||
|
My mentor on this build, Stein did his wheels like this
  I did mine a bit different. This is where the differential in width of the tires comes into play for me. 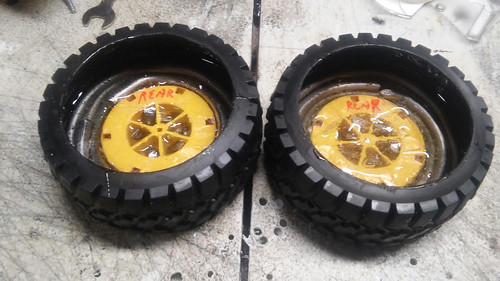 unnamed (20) by Anthony Kalnoski, on Flickr unnamed (20) by Anthony Kalnoski, on FlickrHad I taken the time to look over his build thread a bit more...............I should have did the epoxy a bit differently. I SHOULD have NOT put any in the very center of the wheel hub. I know for next time!
|
|
#125
10-18-2017, 03:46 AM
|
|||
|
|||
|
You could put the hubs on the motor axle the wrong way and just drill a wide hole in the center of the epoxy, wide enough for the axle and hub cylinder to fit in. That would save you half an inch on each side, maybe.
Stein :-)
|
|
#126
10-18-2017, 04:34 PM
|
|||
|
|||
|
Quote:
|
|
#127
10-22-2017, 01:31 PM
|
|||
|
|||
|
As we all know by now, I struggle with electronics!
So............that being said, I have a question. When installing the electronics in the Liebherre 574 front loader, I will be using a 2X12 Sabertooth, & a 2X5 sabertooth. The 2X5 will run the lift actuators, & the 2X12 will power the drive motors. Both will be supplied from the same battery. When I install the leads from the Sabertooth's do I REMOVE the redwires from ALL the connectors that come from the Sabertooth's to the receiver, EXCEPT for 1? Could they all be left intact WITHOUT harm to the receiver &/or Sabertooth's?The weather's getting colder, far & few are going to be the warm days. That said I decided I'd better throw a coat of paint on some parts. I painted the Front axle assembly of the front loader today. There are some spots that have runs, but those nasty looking spots WON'T be seen. They'll be covered up with parts of the original model. I was lazy, & DIDN'T want to take it all apart to paint it. I placed a ziplok sandwich bag over each tire, then neatly folded it around the inside of the tire. 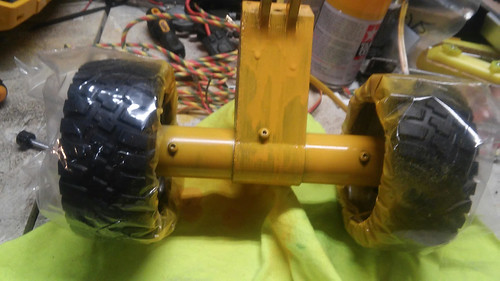 unnamed (23) by Anthony Kalnoski, on Flickr unnamed (23) by Anthony Kalnoski, on Flickr
Last edited by skeeter; 10-22-2017 at 02:50 PM.
|
|
#129
10-22-2017, 04:49 PM
|
||||
|
||||
|
Yes speed control red wires need pulled on all but the one with strongest BEC. Any single bec works, but i'd use big amps if you've got it
The wide stance could be undone with a drillpress or a dremel if you really wanted. I'd see how it looks in mockup before narrowing. Might help keep it from getting stuck, or let it turn with more force.
__________________
What do ya mean "Cars are neither Trucks or Construction"? It's still scale, and i play fairly well with others, most of the time...
|
|
#130
10-22-2017, 05:38 PM
|
|||
|
|||
|
Frizzen, thanks for your help, yet again.
I'll keep the wider stance, for now. If, at a later date I find I'm not enjoying it, I reserve the right to narrow it.
|
|
#131
10-24-2017, 12:22 AM
|
|||
|
|||
|
I arrive home from work today, & find that I have mail!
I knew I was expecting the charge plugs, as tracking info showed that they ha cleared customs. When I open it, it's my charging plugs. I tried to install it like G1050 did. I liked how well it was hidden.  BUT......I boogered it up. While I was trying to drill the air cleaner to accept the charge recepticle, I broke it. I broke it BADLY. So, I now have this instead of an air cleaner.  unnamed (25) by Anthony Kalnoski, on Flickr unnamed (25) by Anthony Kalnoski, on FlickrPerhaps, in the future, I may 3D print a part that will fit inside of it, & look like an air filter. For the time being, it will look like this for the foreseeable future. One of these days, I'll get around to it.
|
|
#132
10-24-2017, 11:45 AM
|
||||
|
||||
|
Have an extra connector that plugs in? Make an air cleaner to glue to it and plug it in the port - remove to charge the battery.
Ken
__________________
Big iron is awesome!
|
|
#133
10-24-2017, 08:39 PM
|
|||
|
|||
|
Quote:
|
|
#134
10-24-2017, 08:50 PM
|
|||
|
|||
|
I had some more mail awaiting me when I got home today.
The battery holder with the built in protection circuits arrived. I was anxious to get into the garage & get it installed. I got a disappointment. Turns out it's a few mm too big to fit into the space available in the D5 dozer. Good thing I already ordered 3 of these! https://www.ebay.com/itm/2-pcs-Plast...72.m2749.l2649 I know I WILL have room to fit ALL 3 of them in, & it will give me 7.2 working volts. NOT as much as I was hoping for, but I'll take what I can get to fit, so I can get this thing FINALLY running! I also ordered one of these. https://www.ebay.com/itm/1-pc-1S2P-1...72.m2749.l2649 Afterall 7.4V is better then 7.2  Here's the pic of the battery holder that 3S battery holder that arrived today, sittin gin the dozer. IF I REMOVED the cab interior, I COULD make it fit. I WON'T do that, as I really want it complete with cab, & all.  unnamed (24) by Anthony Kalnoski, on Flickr unnamed (24) by Anthony Kalnoski, on Flickr
|
|
#135
10-24-2017, 10:08 PM
|
||||
|
||||
|
Maybe a good reason to build a dusty enviroment filter? Or check out some bigger machine filter designs? Maybe a D7 style might look good on the d5
Any chance gutting the battery holder might work? The plastic is all optional, just keep the protection circuit and bus bars, insulation tape over the contacts.
__________________
What do ya mean "Cars are neither Trucks or Construction"? It's still scale, and i play fairly well with others, most of the time...
|
|
#136
10-24-2017, 10:22 PM
|
|||
|
|||
|
Quote:
|
|
#137
10-24-2017, 10:45 PM
|
|||
|
|||
|
I'll address the air cleaner issue after I have a few less things over the fire. Perhaps it's just been recessed to be better out of the operators line of sight. That's my story (For now) & I'm sticking to it.
|
|
#138
10-25-2017, 01:13 AM
|
|||
|
|||
|
IF I buy these, & solder ALL 3 red wires together, to make 1 positive lead, AND do the same to the black wires, to make 1 negative lead, would that battery pack function properly?
 If it'd work, I can still get the 11.4V battery I was hoping to have If it'd work, I can still get the 11.4V battery I was hoping to have  https://www.ebay.com/itm/3-pcs-1S1P-...kAAOSwdGFYq~ec Last edited by skeeter; 10-25-2017 at 01:15 AM.
|
|
#139
10-25-2017, 06:27 AM
|
||||
|
||||
|
I don't know much about the 18650 cells, but you can build them into packs that way.
If you solder all reds together, and all blacks together, you will have a 3p pack. It has single cell voltage, 3x the amps. If you solder a red to black, and another red to black, you'll have a 3s pack. It has 3x cell voltage, and single cell amps.
__________________
What do ya mean "Cars are neither Trucks or Construction"? It's still scale, and i play fairly well with others, most of the time...
|
|
#140
10-25-2017, 07:38 AM
|
|||
|
|||
|
Quote:
|
 |
| Currently Active Users Viewing This Thread: 4 (0 members and 4 guests) | |
|
|


 Linear Mode

