 |
|
|||||||
| Euro Style Trucks and Trailers A place for the Euro style trucks single and twin axle trucks and trailers... |
 |
|
|
Thread Tools | Display Modes |
|
#1
|
||||
|
||||
|
Gave in to the ScaleART addiction and ordered a MAN TGX/XL 6x6 with a 3-axle half pipe trailer to go with it. This one will be white on a red frame. Same for the trailer.
The MAN will have ScaleART's 6-hole trilex wheels and their version of the air suspension. Both chosen to satisfy my curiosity on those bits. There also will be some other bits and pieces that are not part of the standard package. Here goes. As usual the boxes were very well packed in peanuts  After cleaning out the packing material the parts for the TGX  And cab  Started on the frame today. The parts in the top right corner are actually for the heavy duty truck, but I kind of liked having it on this one too.  Started on the cross brace for the frame.   A fiddly exercise in patience to get the nuts on the bolts.  One of these knipex cutters is rather useful to trim the bolts.  And done ...    That's how far I got ... remembered just in time that I am using diamond plate fenders on this one, so have to figure out the position of the rear light support before I can assemble the rest of the frame.
__________________
Cheers, Stephan (Rakthi is the one in the avatar) |
|
#2
|
|||
|
|||
|
Subscribing to this thread and really looking forward to the progress.
Fine project and a good addition to your arocs  Br, Tom |
|
#3
|
||||
|
||||
|
Subscribed as well Rakthi
Another great build on the way |
|
#4
|
||||
|
||||
|
Hi Stephan, congratulations on getting your new ScaleArt truck. I'm also looking forward to the progress. My kit is still in Germany :-)
|
|
#5
|
||||
|
||||
|
Hi Tom, crisis time, well starting to look that progress is not going to be too smooth. Which makes for a more interesting build of course
 Hi Chris, guess you are eagerly awaiting the arrival of your kit! +++++++++++++++++++ Before bolting the frame together I checked the position of the fenders. Mhmm rear support supposed to go in the 7th hole from the back, but frame rail only has 5 holes ... Guess I might have to drill one myself. Will deal with it when we get to it. Since the positioning of the fender determines the position of the rear light holders I might as well go ahead. Can always unbolt stuff.  So we continue with the frame. The cross brace is held on with 4 bolts and te top 2 also hold the rails where the 5th wheel will attach too. There are a further 3 bolts in that rail. The position of the parts is easily determined too.  Easiest to first attach the 3 bolts of the rail  Then the cross brace  After doing the other side  Next up is the simple assembly of the "heavy hauler" end piece   Followed by the fiddly fitting of small bolts in hard to reach places to combine these 3 parts.  The holes in the stainless steel parts do line up perfectly, but they are very tight fit for the bolts. So ran a 1/16" bit through them. Made a world of difference. Still fiddly but at least didn't have to "force" them through.    And that red circle above ... bummer ... the "heavy hauler" end piece is not compatible with the air suspension (see below) ... so either I take it back off or I slice a bit off to give room to the airbag. I'd prefer to cut it down a bit, but don't have the equipment for it ... head scratching time.  The circle on the drawing is where I will have to drill 2 2mm holes on both sides of the frame. No holes foreseen in the cross brace. And I though the tractor part of this build was going to be easy - what I get for trying to be different. 
__________________
Cheers, Stephan (Rakthi is the one in the avatar) |
|
#6
|
||||
|
||||
|
To see how much I would have to grind off the heavy hauler end piece I did a quick and dirty photoshop to visualise if it would be do-able.
 Looks like close to half has to go. Wouldn't look to good. So I'll take if off and use it as an excuse for a future project - an Actros SLT comes to mind  
__________________
Cheers, Stephan (Rakthi is the one in the avatar) |
|
#7
|
||||
|
||||
|
Took the better part an hour to remove the part and re-assemble.
As per manual I left the middle one open. Am 99.99% sure that is where the fender support will go. Haven't shortened the bolts yet until I know where the rear light support will go.  
__________________
Cheers, Stephan (Rakthi is the one in the avatar) |
|
#8
|
||||
|
||||
|
Drilled the 2 mm holes in the cross brace for the suspension.
  Did a trial install to determine how the rear fender and rear lights are going to fit. The center support is another one of those nicely detailed bits that will sadly be mostly hidden after install.   It goes here, in the center of the 2 rear axles right above the axle support  2 M2 nuts are used as spacer.   Fender will attach to the center support with 4 bolts (circled the little holes because they are hard to see)  The other supports and attachment parts  Temporarily installed  Next is the rear lights.  This is the way the support is to go. But not enough room. The clamps holding the fender to the support are in the way.  Could swap left and right side, that seems to work, but then the rear lights stick out behind the frame and will be easily damaged.  Other solution would be to attach lights directly to the fender. Ideally they should go higher and above the fold.  That is probably the best solution. Just have to figure out how to do it.
__________________
Cheers, Stephan (Rakthi is the one in the avatar) |
|
#9
|
||||
|
||||
|
Finally found some time to do some more.
Figured I start with the air suspension.  The "don't know how you call this" bits that will bolt on to the axle and then to the 2 air springs.  Took one of the air springs apart to see what it consists off.  Before I bolted them onto the chassis, I shortened the little bolts. I didn't touch the ones in the back yet.  First thing to go on is the axle support which is included in the package. Supposed to be bolted on with M2x4 philips screws. I found those a bit on the short side. I prefer the bolt to stick out a bit from the nut, so I replaced the philips screws with M2x5 ones I had left over from the AROCS build.  This container contains all the nuts, bolts, screws etc left over from the AROCS. ScaleART is generous in supplying fasteners.  First one installed where I had to drill out the cross brace. Hardest one to get the screws in. (M2x5)  The cross brace needs to be pushed as high up as possible to fit the heads of the M2 Philips screws  The air spring only fits one way to the frame rail.  One side done   Both sides.   More to come
__________________
Cheers, Stephan (Rakthi is the one in the avatar) |
|
#10
|
||||
|
||||
|
first the tipper now this. wow you love the abuse!!!
great fun to watch for sure |
|
#11
|
||||
|
||||
|
Hi bigford, wouldn't call it abuse really. Since I sold the bike and the Defender, putting this together kind of keeps me sane.
With all the non-standard parts on this one I can look forward to plenty of "abuse"  
__________________
Cheers, Stephan (Rakthi is the one in the avatar) |
|
#12
|
||||
|
||||
|
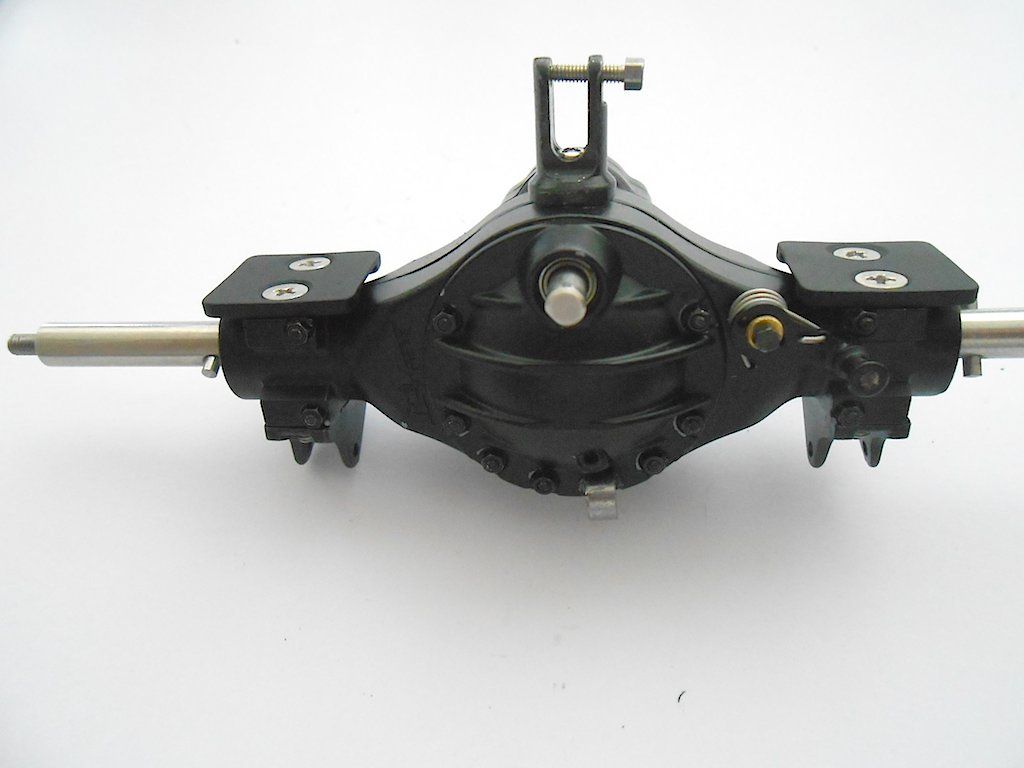
Did a trial fit of the rear axle. Noticed they made an update.
They removed the ugly philips screw that held the clamp for the bowden cable  Here a pic of the older version:  The other side with the updated way to hold the bowden cable  The previous version:  The axle gets attached to the axle supports  Those installed, remove the nuts from the bottom of the air suspension  And bolt in place with the previously removed nuts  And here we will need to do a small adaptation to be able to lock the differential. As you can see the attachment point hits the air suspension. This is pointed out in the documentation.   Will be for another time.
__________________
Cheers, Stephan (Rakthi is the one in the avatar) |
|
#13
|
||||
|
||||
|
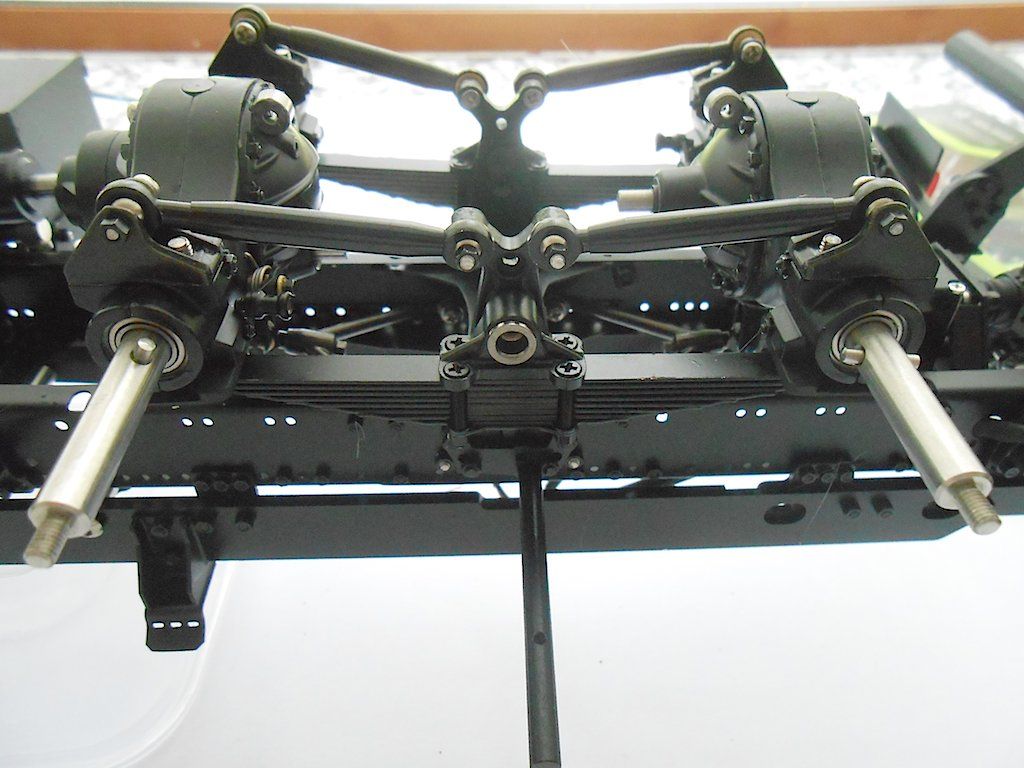
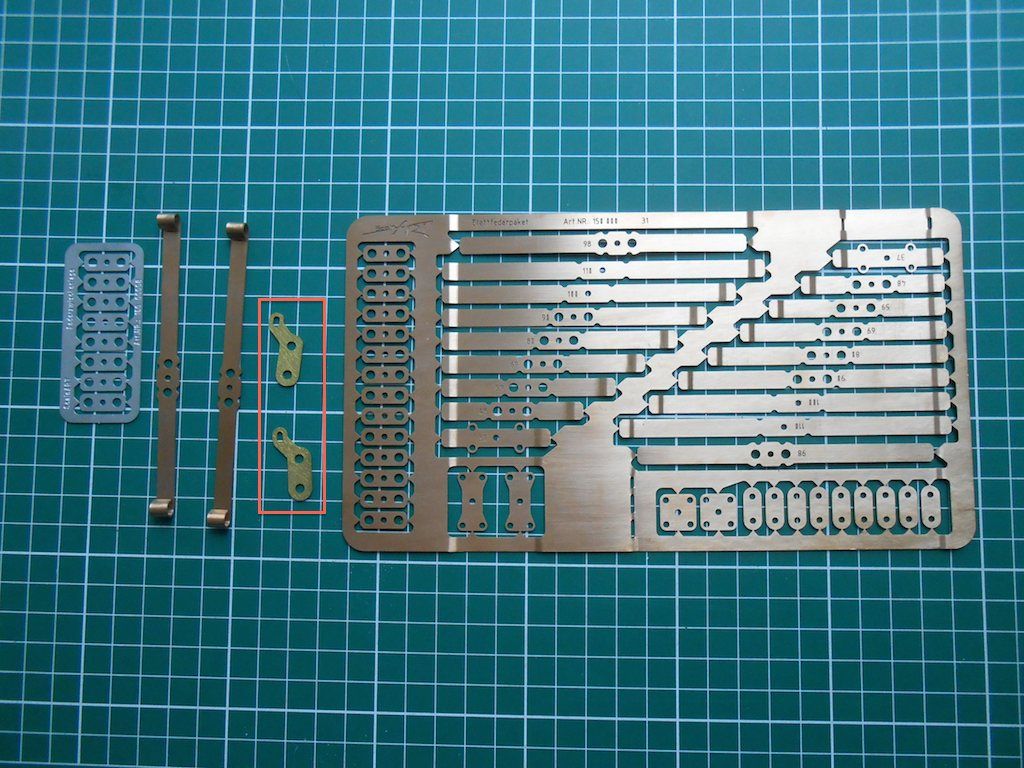
Did the front axle suspension.
Also an upgraded item. It now comes painted black (is still brass) and the spacers between the leaf springs have become longer, making the whole a more sturdy. The guides for the bowden cable (not used here) are now also part of the plate and no longer separate. Updated set:  Previous set:  Assembling the suspension. The parts are twisted out of the plate. Before assembling I smoothened the parts where they were attached to the plate.   Attaching the rear support   Used the wrong nuts here. Replaced them with the right ones later.  First attach front support to frame followed by the rest of this assembly.     Left over parts 
__________________
Cheers, Stephan (Rakthi is the one in the avatar) |
|
#14
|
||||
|
||||
|
Found the time to trim the bowden cable attachment points on the rear axles.
 I drilled a 1.5mm hole too. I figure it will give me more options to attach the bowden cable later on.  Both axles installed and no longer touching the air suspension where I trimmed the attachment point.   Because I have a driven axle for the front suspension, I had to remove the screws I installed to mount the spacer.     I have not used Loctite yet. Due to the air suspension, the whole thing will have to come apart again later for painting.
__________________
Cheers, Stephan (Rakthi is the one in the avatar) |
|
#15
|
||||
|
||||
|
Hi Stephan,
congratulation to you for your new kit! - As I can see you've already startet. And there are already some of your adjustments - that´s fine! - I´ll follow your build. It´s nice to see that ScaleART always improves their products! 
__________________
Greetings Christian You can find some of my RC-models on To view links or images in signatures your post count must be 10 or greater. You currently have 0 posts. Normally I´m speaking german, please forgive my mistakes in English. Last edited by Newcomer_2; 11-02-2015 at 09:32 AM. |
|
#16
|
||||
|
||||
|
Hi Christain... yes started it, but taking it slowly and not really following the manual this time and am trying to figure out myself where and how things will fit. More fun that way.
Is indeed interesting to notice the upgrades/changes they made over the past year. The front suspension sure is stiffer than the one on the Arocs, might consider upgrading that one later on.
__________________
Cheers, Stephan (Rakthi is the one in the avatar) |
|
#17
|
||||
|
||||
|
Quote:
that sounds very interesting! Yes, I believe, you'll have much more fun this way. - So, I'll stay tuned.
__________________
Greetings Christian You can find some of my RC-models on To view links or images in signatures your post count must be 10 or greater. You currently have 0 posts. Normally I´m speaking german, please forgive my mistakes in English. |
|
#18
|
||||
|
||||
|
Finishing the rear suspension. Not too detailed because it is very similar to the Arocs.
First the "A" frames that hold the axles in place.   When looking at the picture to decide which ones to post here, I discovered I made an error  The "A" frames should be attached through the holes marked with an arrow. Now I have them were the center support for the rear fenders is supposed to go - DUH The "A" frames should be attached through the holes marked with an arrow. Now I have them were the center support for the rear fenders is supposed to go - DUH Here is a difference with the regular suspension. The "A" frame is easier to attach to the axle. They only use a tube instead of the more complicated attachment of the leaf suspension. This probably because the air suspension is way stiffer and has less movement.   Next up is the track rods.  A bit of contradiction in the attached assembly sheet:  So first tried the 53 mm ... as you can see way to long. Would really torque the axles on the rubber parts  Also tried the recommended 49mm but at that length it still pushes the axles too hard. Ended up with 47mm  A perfect fit for all 4 positions.  The powder coating on the balljoints was too thick and made inserting them in the covering tube practically impossible. Reaming out the tube was a no go. The 3.5mm bit too small and the 4mm too big. So clamped a long M2 bolt in the drill and it as a lathe together with some files and sand paper to get rid of the powder coating.   After that no problems and soon everything bolted together.   Now just have to reposition the two "A" frames in the right position.
__________________
Cheers, Stephan (Rakthi is the one in the avatar) |
|
#19
|
||||
|
||||
|
Fixed the attachment of the "A" frame.
 Installed the rod tying both front wheels together.  The rod is supposed to go on top (on bottom here because upside down), but the new way of fixing the bowden cable gets in the way and limits the steering angle  Decided to bolt it on the underside so the rod does not touch the clamp of the bowden cable.  
__________________
Cheers, Stephan (Rakthi is the one in the avatar) |
|
#20
|
||||
|
||||
|
Haven't had much time lately, so not much progress.
Did the Trilex rims for one of the rear axles today. Here all the parts in order of assembly. All the parts are made of machined aluminium, the red bit is a cast piece.  The inside hub, front and back   One of the tow rims. There is a ridge on one side on both of them.  The part that goes between the two rims. The "teeth" fit into the cast piece.   Cast piece, front and back   Assembling the parts. The cast bit goes into one of the rims until it is firmly pressed against the before mentioned ridge.  The distance piece goes on next with the "teeth" fitting into the cast piece.  Next the second rim is placed ridge down on top of this and the inside hub is dropped in. The inside hub fits just so with the thicker parts of the distance ring where the "teeth" are. This way the holes for the bolts line up. The inside hub has threaded holes.  Bolts in place and test fit on axle - Note: the bolts provided are M2x4.5. I will replace them at a later time with M2x8 or M2x10 model bolts. The M2x4.5 only have 2-3 threads in the inner hub. Doesn't take much force to strip the threads either. (Found out the hard way)  Tyres in place - sorry about the cat hairs on the pictures, had "help"  And mounted on axle with the hubcap in place (hubcap has a small rubber ring to hold it in). Still need to paint the hubcap red and insert the little M1 bolts. Also thinking of painting the rims red too ... 
__________________
Cheers, Stephan (Rakthi is the one in the avatar) |
 |
| Tags |
| man tgx xl, scaleart, trailer |
| Currently Active Users Viewing This Thread: 2 (0 members and 2 guests) | |
|
|