|
|||||||
| Highway Trucks and Trailers On road trucks and trailers single and twin axle trucks. |
 |
|
|
Thread Tools | Display Modes |
|
|
|
#1
 08-12-2011, 07:26 PM
|
||||
|
||||
|
Hello, for those of you that know of me from the other forum I will spare you the 9 pages of BS and planning stuff.
I still have not got my KH yet, however Rick (Rogue) gave me a cab and an extra sleeper, and other parts about a year or so ago. I have had a heck of a year and am just now getting around to starting on the build. I started this build by drawing up the truck on the computer. I changed a thing here and there till I came up with exactly what I wanted. Believe me it is worthy of the term "Large Car... Or condo which ever..     The bumper to back of sleeper will be 20" (280" Scale) and the frame will be 35" (490" Scale) The bunk "House" will be a 144" ARI inspired sleeper.
__________________
To view links or images in signatures your post count must be 10 or greater. You currently have 0 posts. Mike "DREAMWEAVER" Johnson To view links or images in signatures your post count must be 10 or greater. You currently have 0 posts. RIP FreddyGearDrive 2-12-59/12-19-11 Rims and Tanks by ihbuilder / Grill and Visor by Brian in PA / Mirrors, Front and Rear Bumper, Back of Cab Lights, and Steering Arms by tc1cat / Fenders by Stylin n Profilin / Frame Rails by The Late Freddy Gear Drive Last edited by Dreamweaver; 11-11-2011 at 01:20 AM. 
|
|
#2
08-12-2011, 07:27 PM
|
||||
|
||||
|
I spent countless hours today sanding, filling, sanding ect.. The hood, the cab other small parts here and there.
Well lets see today I built the rear sleeper door out of the side doors from both the stock sleepers.  I did some more work on the cab. I got the top done. and cut the blind spot window in the right door.   I also made a little more progress on the hood.. Well I am done with the hood basically with the exception of a little sanding on the inside tomorrow. I Will be painting the inside of the hood complete with the graphics that will be on the side so I had to clean up the underside of the hood with some styrene and putty, I need to sand the putty tomorrow and then install the styrene on the inside of the fenders to.  Now being that this is going to be a slightly larger sleeper than stock, I figured that it will need a good A/C system so I made a rooftop cooler.    And then for that down time, a satellite dome.  At least I found a use for one of those plastic Easter eggs, or three rather, It's not easy to cut them things straight.  Now all I need is for my styrene to get hear and then I can start building the sleeper. The bummer part is that once I get that finished I will be out of things to build till I get my KH bought. There is a lot of fabrication that needs to be done, but I need it sitting on a frame and suspension, I ordered the frame from Joe the other day but I still need it siting on it's own. -Mike
|
|
#3
08-12-2011, 07:32 PM
|
||||
|
||||
|
Hey All!!
I really didnt like the first A/C unit so I built another one.     Now I got the doors cut off and I am just waiting on my hinges so that I can do my "Special" opening doors. Rick (Rogue) sent me a box of goodies the other day (Thanks Buddy) and among them was some Wedico seats. I wanted these cause they look sooooo much better than the Tamiya seats. So I got them but in temporarily of course, because I still have to make the Marble floor....  Also in the package was one headlight for fitting purposes... If you look at the original drawings I was going to mount the headlights on a tube that went in front of the grill. I scratched this idea after getting my hands on the headlights I am going to use. Instead I decided to put them on the side of the hood. Now the lights come with a short tube (Mounting Bracket ?) so I tried them with that first.  And was not to sure about them. So I then tried it with out the tube, right against the hood.  I liked this better but think they need a little space between them and the hood. So Rick suggested that I use a cone washer. Boy that Rick...... He is good for an idea now and again.  I decided to tackle the grill last night (because non of my supplies have got here yet, so i have nothing else to do), I removed the bars and built up the inside so that the grill would be moved forward in the grill shell where it is supposed to be.  I then made new bars and installed them, then gave the Bare Metal Foil a shot... Nice stuff, I just wish it looked more like chrome. Here is what I got... Not 100% on it so might be ordering a new grill and going at it again.  Well hopefully all my stuff will be here Monday so that i can get started on the house.... I mean sleeper... -Mike
|
|
#4
08-12-2011, 07:33 PM
|
||||
|
||||
|
Howwwdy..
Well today I decided I wanted to lay some marble tile in the cab... WOW do you know how hard it is to find 1:14 marble tiles... Ok it's impossible so I had to make it my self... Man that is a pain in the butt, you got any idea how hard it is to cut marble let alone into that small of pieces.. Well actually I am going to share with you how I did it.. Step one: Get some Transparency Film. Like the stuff they used for the overhead projectors. Cover one side completely with blue painters tape to protect that side from any paint over spray.  Step two: Chose a few similar colors in different shades. I used Poly-scale paints. They are water based. I used SCL Hopper Car Beige, and Earth. Then you need a Stone color, or a darker gray color. I used a special paint for making stone scenery on a RR layout.. (Might as well, I got thousands of $ worth of RR stuff filling 16 good sized boxes in the basement, why not use some of it) Take the lighter color first, dip a fairly soft brush in the paint and then tap the brush on your other hand about 6-8 inches above the film. This will cause droplets on the film. Then I took my air gun on the compressor and blew the droplets in basically one direction. Repeat this with the second color. Then when that is all done cover the entire thing with the gray color. when it's dry turn it over and remove the tape and see you marble.  Step three: In order for it to look like tile you have to make it tile... 1:14 scale is roughly 13/16 for a scale foot... Get cutting.  Step four: Take some of this stuff.  Before you pull the backing off of it in the front side draw your grid to help aid in the placement of the tiles.. This stuff is EXTREMELY Sticky. if you put a tile on it you will most likely not get it off.. In fact I tried one and I got the acetate off but the paint stayed on the sticky paper...   Step five: Spray both the underside of the now completed flooring and the floor you intend to tile, with spray glue. Super 77 is the best. Allow to set for a minute then put the two together.. Step six: Trim to fit.  I then added the seats and made the Gear shift floor cover. Next I added the shift boots.. YES BOOTS the "S" belongs there.. This is a real truck after all...  I then made the much beloved (In my book anyway) Peterbilt cup holder stand.    There Ya go.. scale marble flooring... If ya don't have the budget for marble then you can make linoleum. Just first don't blow the colors with the air gun and second don't cut it up. Just glue it to the floor hole.. -Mike
|
|
#5
08-12-2011, 07:34 PM
|
||||
|
||||
|
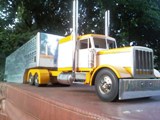
Ok now there is no better way to visualize the magnitude of this truck without seeing it.
So I got the rails today. They are 35" long that's a 490" wheel base I believe.  Those are stock KH rails next to mine.  The box is the proper length but a little higher than the sleeper will be. However it is just under 13'6" as it sits... There is still 13" of frame behind the sleeper. that's 182" 15"   -Mike
|
|
#6
08-12-2011, 07:36 PM
|
||||
|
||||
|
Howdy all.
Ok a few posts back I said that I was going to do something special with the doors and that is why I cut them out.. Now I am sure some of you were thinking... "What a moron, don't he know several guys have made opening doors." Well YES I do know that.. However have they ever made them like this.... SUICIDE DOORS    If some one has done suicide doors, I have not seen the model. -Mike
|
|
#7
08-12-2011, 07:54 PM
|
||||
|
||||
|
good to see you back Mike ! The truck is looking great and the detail is nice i like the drink holder between the seats. I think your truck will be bad azzz when your done !
__________________
SHANE... Member of the Central Plains Mini Truckers..
|
|
#8
08-12-2011, 08:03 PM
|
||||
|
||||
|
Quote:
Thanks Shane, Glad to be back.
|
|
#9
08-12-2011, 08:05 PM
|
||||
|
||||
|
Hello Gent's
Well I have not done much at all since New Years. I ran out of my styrene weld and ordered some more, ordered it on the 31st but it is not here yet. UPS tracking says it should be here today. I got the front fenders shaped and sanded, and the hood coated and sanded.      Notice I left the grill on the hood when I sanded it. I was not happy how the grill came out and I noticed that the line between the hood and grill was not all that good, so I sacrificed the grill's chrome to make the hood look right. So I can still use the grill if I ever do a Mono-chromed truck. But the lines are great now.. Hoping the weld gets here today so that I can do something with it this weekend. ~Mike~
|
|
#11
08-13-2011, 10:37 AM
|
||||
|
||||
|
Today I got the front section of the running boards built.
       I also added the 359 hood center detail.  ~Mike~
|
|
#12
08-13-2011, 10:38 AM
|
||||
|
||||
|
Ok tonight I installed the light bars under the sleeper. I am basically done with the building from the bumper to the back of the sleeper. I have a few more things like the wings for the sleeper. I have to make the tanks and another side box, and the steps for the rear access, but I need to get the frame done first.
      ~Mike~
|
|
#13
08-13-2011, 10:39 AM
|
||||
|
||||
|
Well I guess my mind is made up about the rear suspension, I just ordered the stock rear suspension and the crossmember for it.
~Mike~
|
|
#14
08-13-2011, 10:41 AM
|
||||
|
||||
|
Well I'm at it again. This time I started with the necessities, can't drive a Peterbilt if the seats are aired up, you'll get a nose bleed sitting that high.
 I am using some Wedico seats. They are just the right size and they look better than the Tamiya seats. I built the Pete center cup holder a while back and got it installed now.  Next I built some scale shocks. The stock Tamiya shocks measure out to be 4-3/8" in scale. I got some 1/4" and some 3/16" brass tubing and made me some proto shocks. the 1/4" = 3.5" scale and the 3/16" = 2-5/8" more to the right size. However diameter was not the only thing that bugged me. The length of the stock shocks is WAY wrong. Making the mounting locations wrong specially on the front. I made these so they are the proper size and then i made the proto shock mounts.    ~Mike~
|
|
#15
08-13-2011, 11:41 AM
|
||||
|
||||
|
The best highest detailed build I have ever seen.. Glad to see it back on the board Mike and I cant wait for updates..
__________________
Paul W. "Tamiya Cowboy" HI.. My name is Paul.. And.. I.. Have a Cabover Addiction. RIP FreddyGearDrive 2-12-59/12-19-11 "LET IT EAT" Like Us on Facebook "Corn Field Mafia" To view links or images in signatures your post count must be 10 or greater. You currently have 0 posts.
|
|
#16
08-13-2011, 11:44 AM
|
||||
|
||||
|
Quote:
However updates will be at a much later date... 
|
|
#17
08-13-2011, 11:45 AM
|
||||
|
||||
|
Well that's where I am at this point in time.
I am patiently waiting for Steve (ihbuilder) to make my Air Cleaners, Fuel Tanks, and Wheels. Then I have to get the motor to Lynn for some machine work needed to put the steering servo inside the motor. Then get the MFU and the electronics installed along with the drive motor and transmission. Once I get all that done and everything works right then I will paint her up and start the final assembly.. Now all that is looking like it won't happen for quite a while. ~Mike~
|
|
#18
08-13-2011, 12:31 PM
|
||||
|
||||
|
Wow this is one beautiful rig all the detail just wow i am awestruck so i gotta ask when you do the lights will the dashboard have lighted gauges and such?
Mike
__________________
To view links or images in signatures your post count must be 10 or greater. You currently have 0 posts.
|
|
#19
08-13-2011, 12:34 PM
|
||||
|
||||
|
Quote:
Yes they will be back lit. The turn signal indicators and the high beam indicator will also work. ~Mike~
|
|
#20
08-16-2011, 10:03 AM
|
||||
|
||||
|
Quote:

__________________
Michael also known as "The Crimson Corsair" To view links or images in signatures your post count must be 10 or greater. You currently have 0 posts. To view links or images in signatures your post count must be 10 or greater. You currently have 0 posts.
|
|
| Currently Active Users Viewing This Thread: 1 (0 members and 1 guests) | |
|
|


 Hybrid Mode
