|
|||||||
| Highway Trucks and Trailers On road trucks and trailers single and twin axle trucks. |
 |
|
|
Thread Tools | Display Modes |
|
#1
 08-12-2011, 07:26 PM
|
||||
|
||||
|
Hello, for those of you that know of me from the other forum I will spare you the 9 pages of BS and planning stuff.
I still have not got my KH yet, however Rick (Rogue) gave me a cab and an extra sleeper, and other parts about a year or so ago. I have had a heck of a year and am just now getting around to starting on the build. I started this build by drawing up the truck on the computer. I changed a thing here and there till I came up with exactly what I wanted. Believe me it is worthy of the term "Large Car... Or condo which ever..     The bumper to back of sleeper will be 20" (280" Scale) and the frame will be 35" (490" Scale) The bunk "House" will be a 144" ARI inspired sleeper.
__________________
To view links or images in signatures your post count must be 10 or greater. You currently have 0 posts. Mike "DREAMWEAVER" Johnson To view links or images in signatures your post count must be 10 or greater. You currently have 0 posts. RIP FreddyGearDrive 2-12-59/12-19-11 Rims and Tanks by ihbuilder / Grill and Visor by Brian in PA / Mirrors, Front and Rear Bumper, Back of Cab Lights, and Steering Arms by tc1cat / Fenders by Stylin n Profilin / Frame Rails by The Late Freddy Gear Drive Last edited by Dreamweaver; 11-11-2011 at 01:20 AM. 
|
|
#2
08-12-2011, 07:27 PM
|
||||
|
||||
|
I spent countless hours today sanding, filling, sanding ect.. The hood, the cab other small parts here and there.
Well lets see today I built the rear sleeper door out of the side doors from both the stock sleepers.  I did some more work on the cab. I got the top done. and cut the blind spot window in the right door.   I also made a little more progress on the hood.. Well I am done with the hood basically with the exception of a little sanding on the inside tomorrow. I Will be painting the inside of the hood complete with the graphics that will be on the side so I had to clean up the underside of the hood with some styrene and putty, I need to sand the putty tomorrow and then install the styrene on the inside of the fenders to.  Now being that this is going to be a slightly larger sleeper than stock, I figured that it will need a good A/C system so I made a rooftop cooler.    And then for that down time, a satellite dome.  At least I found a use for one of those plastic Easter eggs, or three rather, It's not easy to cut them things straight.  Now all I need is for my styrene to get hear and then I can start building the sleeper. The bummer part is that once I get that finished I will be out of things to build till I get my KH bought. There is a lot of fabrication that needs to be done, but I need it sitting on a frame and suspension, I ordered the frame from Joe the other day but I still need it siting on it's own. -Mike
|
|
#3
08-12-2011, 07:32 PM
|
||||
|
||||
|
Hey All!!
I really didnt like the first A/C unit so I built another one.     Now I got the doors cut off and I am just waiting on my hinges so that I can do my "Special" opening doors. Rick (Rogue) sent me a box of goodies the other day (Thanks Buddy) and among them was some Wedico seats. I wanted these cause they look sooooo much better than the Tamiya seats. So I got them but in temporarily of course, because I still have to make the Marble floor....  Also in the package was one headlight for fitting purposes... If you look at the original drawings I was going to mount the headlights on a tube that went in front of the grill. I scratched this idea after getting my hands on the headlights I am going to use. Instead I decided to put them on the side of the hood. Now the lights come with a short tube (Mounting Bracket ?) so I tried them with that first.  And was not to sure about them. So I then tried it with out the tube, right against the hood.  I liked this better but think they need a little space between them and the hood. So Rick suggested that I use a cone washer. Boy that Rick...... He is good for an idea now and again.  I decided to tackle the grill last night (because non of my supplies have got here yet, so i have nothing else to do), I removed the bars and built up the inside so that the grill would be moved forward in the grill shell where it is supposed to be.  I then made new bars and installed them, then gave the Bare Metal Foil a shot... Nice stuff, I just wish it looked more like chrome. Here is what I got... Not 100% on it so might be ordering a new grill and going at it again.  Well hopefully all my stuff will be here Monday so that i can get started on the house.... I mean sleeper... -Mike
|
|
#4
08-12-2011, 07:33 PM
|
||||
|
||||
|
Howwwdy..
Well today I decided I wanted to lay some marble tile in the cab... WOW do you know how hard it is to find 1:14 marble tiles... Ok it's impossible so I had to make it my self... Man that is a pain in the butt, you got any idea how hard it is to cut marble let alone into that small of pieces.. Well actually I am going to share with you how I did it.. Step one: Get some Transparency Film. Like the stuff they used for the overhead projectors. Cover one side completely with blue painters tape to protect that side from any paint over spray.  Step two: Chose a few similar colors in different shades. I used Poly-scale paints. They are water based. I used SCL Hopper Car Beige, and Earth. Then you need a Stone color, or a darker gray color. I used a special paint for making stone scenery on a RR layout.. (Might as well, I got thousands of $ worth of RR stuff filling 16 good sized boxes in the basement, why not use some of it) Take the lighter color first, dip a fairly soft brush in the paint and then tap the brush on your other hand about 6-8 inches above the film. This will cause droplets on the film. Then I took my air gun on the compressor and blew the droplets in basically one direction. Repeat this with the second color. Then when that is all done cover the entire thing with the gray color. when it's dry turn it over and remove the tape and see you marble.  Step three: In order for it to look like tile you have to make it tile... 1:14 scale is roughly 13/16 for a scale foot... Get cutting.  Step four: Take some of this stuff.  Before you pull the backing off of it in the front side draw your grid to help aid in the placement of the tiles.. This stuff is EXTREMELY Sticky. if you put a tile on it you will most likely not get it off.. In fact I tried one and I got the acetate off but the paint stayed on the sticky paper...   Step five: Spray both the underside of the now completed flooring and the floor you intend to tile, with spray glue. Super 77 is the best. Allow to set for a minute then put the two together.. Step six: Trim to fit.  I then added the seats and made the Gear shift floor cover. Next I added the shift boots.. YES BOOTS the "S" belongs there.. This is a real truck after all...  I then made the much beloved (In my book anyway) Peterbilt cup holder stand.    There Ya go.. scale marble flooring... If ya don't have the budget for marble then you can make linoleum. Just first don't blow the colors with the air gun and second don't cut it up. Just glue it to the floor hole.. -Mike
|
|
#5
08-12-2011, 07:34 PM
|
||||
|
||||
|
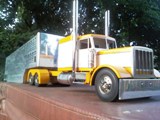
Ok now there is no better way to visualize the magnitude of this truck without seeing it.
So I got the rails today. They are 35" long that's a 490" wheel base I believe.  Those are stock KH rails next to mine.  The box is the proper length but a little higher than the sleeper will be. However it is just under 13'6" as it sits... There is still 13" of frame behind the sleeper. that's 182" 15"   -Mike
|
|
#6
08-12-2011, 07:36 PM
|
||||
|
||||
|
Howdy all.
Ok a few posts back I said that I was going to do something special with the doors and that is why I cut them out.. Now I am sure some of you were thinking... "What a moron, don't he know several guys have made opening doors." Well YES I do know that.. However have they ever made them like this.... SUICIDE DOORS    If some one has done suicide doors, I have not seen the model. -Mike
|
|
#7
08-12-2011, 07:37 PM
|
||||
|
||||
|
I started building the sleeper this evening. (wait yesterday evening since it's now Monday)
I started the day off getting my doors hung, and then I made some big pipes!!!     I'm starting to think that I am going to have to lower the truck from stock, not sure if that would be a good thing with the length though. At least it should not get high centered on anything at stock height. -Mike
|
|
#8
08-12-2011, 07:38 PM
|
||||
|
||||
|
Hi All..
Well I got the sleeper built. It measures 12"L (168") x 6"H (84") x 65/8" W (92.75")     I built a mock-up step so that I can get the running boards built as well as the hood.  It's moving right along for now. I need to take a break, or rather I should say I need my wallet to take a break from it for the rest of the year though, with the holiday's here. -Mike
|
|
#9
08-12-2011, 07:39 PM
|
||||
|
||||
|
Howdy!!!
Well another day gone to modeling. Today I got a lot done. The problem is I am running out of cheap things to do... I almost have all the styrene work done. I have the hood to finish and then the running boards and rear fenders, but can't do that till I have some suspension.. Well to day I built the whale tail, both boxes, mocked up some fuel tanks out of a paper towel roll and hung them with the stock tank hangers Rick (Rouge) gave me. The funny thing is a paper towel roll is exactly the size I need.. Except to short. I cut it in two and got 5.5" tanks and I need 8" tanks. Or probably some 5" fuel tanks and 3" water tanks.    The light bars I will be making are 1/4" so I built the boxes so they hang 3/8" below the bottom edge of the sleeper.   The boxes are built so that they will be flush with the side of the house... I was thinking of making them open but I really don't want the un-sightly hinges messing up the view. I will probably cover these with the Parma Chrome.. or I might get them made out of billet. I plan on mounting the switches in the left box so I did not build a back on them.   -Mike
|
|
#10
08-12-2011, 07:40 PM
|
||||
|
||||
|
Howdy..
Well I got the engine stripped, no more of that ugly yellow paint... Travis don't worry man.. the best engines come in yellow, I believe that with all my heart... Well except the ones that come behind the Blue Oval.. I find it amazing at the level of detail Norscott put into this engine. It looks like a real block with no paint on it yet.     The oil pan, valve covers, and exhaust manifold will be chromed. (polished really).  Got to sand the manifold still. Well I also got the stuff for my fenders and got the inner fender spacers made, I got the fenders cut as far as I could. Now I am at a dead point. I need cross members, a front suspension, and nuts and bolts before I can really do anything else. -Mike
|
|
#11
08-12-2011, 07:43 PM
|
||||
|
||||
|
Hi Gent's,
Ok well I had to play some more to day. I decided I did not want to lose any of the details from the engine, like the oil filter ect. But at the same time I wanted, and needed, the engine to be lower in the frame, thus the reason for turning the oil pan. I accomplished this by notching out the frame, not like some have done where they just notch out for the oil filter. That would not have been enough to get the engine low enough in the frame. I was not sure it was going to work so rather than screw up my new rails, I used some stock ones that I got from Semi Joe.(Thanks Joe)    I then made the front motor mount like they real things.    This got the motor sitting right where I want it. I just hope it will clear the axle... If anyone with a stock height KH could measure from the bottom of the frame to the top of the axle and let me know what it is, I would appreciate it. I am sitting 1 1/32 from the bottom of the frame to the drain plug, which is the lowest point that could interfere.  NOW FOR SOME REAL DETAIL Well someone, I think it was Paul, mentioned the detail I was putting into this truck. I made the comment back that he had not seen anything yet.. Well maybe the following will show the level I am going for. I have seen a bunch of pics of these trucks with this engine in it but I have yet to see one with this kind of detail... Oh ya and this is JUST the start. Still to come a Radiator, Air-to-Air cooler with all appropriate plumbing, Engine Fan with fan belt. Notice that there is now only one turbo.... None of that Acert crap... This is a real C15 polluting, fuel guzzling, hill climbing Kitty Cat....     The detail I plan on putting in here is the main reason why I added the inch to the hood originally, Well that did not work out so I had to set the engine back into the cab a bit. Judging from the pictures of Semibigrigger's install. I only moved mine back about 1/4 to 3/8 farther back than his. And he was still able to put in that full dashboard and kick panel.. Beside It will give me a place to put some chrome and some light and make it so that you can see the reflection of the back of the motor.. Stay Tuned... -Mike
|
|
#12
08-12-2011, 07:44 PM
|
||||
|
||||
|
Hi All!!..
I did a little more detail work on the engine today. I scratch built a fan for it. Mounted it and used a real fan belt.      The blades at the widest are 5/8 so if I did the math right that would be 8.75" so they are just right. Rough measurements leaves me just under 7/8" from fan to end of hood. There should still be enough room for the radiator and air-to-air cooler. -Mike
|
|
#13
08-12-2011, 07:47 PM
|
||||
|
||||
|
I had a Brain storm, or at least I think I did. Hopefully when I tell ya what it is then it won't end up being a Brain Fart...
I went to a couple sites that were furnished by Steve on another thread. The site had all sorts of servos. Looking at the sizes and what Nate told me. I found a place to put the servo for the steering that would be completely trick.... BUT I have to ask questions because I have not got a clue at all about the RC part of this...Give me a train and DCC and I can do anything with it.. RC.... Not yet!! So my first question is.. Can you extend the shaft from the servo to the part that the steering link would connect to? Here is my idea.. If I can extend the shaft, and with the size of the servos. The best coolest place to put the servo would be Ready for this... Inside the engine.  The hole for the stand that the engine comes on would be a perfect place to put the thing through. I think just from eye-balling it it should be just slightly forward of the axle. So will this work, can it be done. I figure I will have to extend the shaft on the servo by about 1/2" max... Any and all comments and help please... -Mike
|
|
#14
08-12-2011, 07:48 PM
|
||||
|
||||
|
Hello All,
Well today I built my mirror brackets. I modeled them after the 2006 to present brackets. All I need now are the mirrors. I even built the blind spot mirror "L" brackets.   Nice and straight...   Just like on the 1:1 trucks, all that sticks out past the sleeper is the mirror and the outside hoop.   Making progress..   Got the sleeper ready for paint, and the cab is just about there. -Mike
|
|
#15
08-12-2011, 07:50 PM
|
||||
|
||||
|
Howdy,
Well I got the paints picked out to day, and I got the painter at my families body shop to agree to help me paint the truck. (later got to finish it first) Since I can not find a paint chip of the color, I will post a pic of my 2006 "Award Winning" Pete show truck. I am using the same exact colors as on this truck. Boy I really loved this truck.. Some farmer in South Dakota owns it now, minus the sleeper.  And the inside with my 1st place plaque.  It's a little hard to see to much of the purple, but it is a stock Peterbilt color so we have the paint code for it at the shop... easy to make the painter says. This picture was taken in SLC at the SLC truck show August of 2006. The truck was just right at one year old. This was my third show truck that I built. (keep in mind I never owned any of them, I was just stupid enough to spend my hard earned money on them) I got this truck brand new (25 miles on her, plastic still on the seats, bed, and carpet in the sleeper) I was driving for one of this companies owner operators. He decided to pull his truck off their fleet and go back to running under his authority, so when he did that JFI asked me to stay with them, offered me more money and then bought me this brand new truck. The truck I was driving for the owner operator was also a show truck, my second one to be exact. This truck was bought straight white, no lights or anything else. They gave me the keys a phone number to the local Pete dealer, and a phone number to the man that did the vinyl graphics for the company, and then told me go have the paint, lights, and graphics done how I wanted them... I designed the graphics my self on this truck and had the finders painted this purple and all the lights put on it. In the second picture you see the peddles, I built those out of Red Oak. NO ONE but me ever drove this truck while I was assigned to it. The mechanics would have to do all the work on the truck either why I was there, or I would pull it in and then they would have to call me to come take it out or leave it inside till the next morning when I got there. The whole time I drove this truck to the best of my knowledge no one ever wore shoes inside the truck. First thing in the morning when I would get up I vacuumed the floors and seats, wiped down the dash, washed the windows inside and out, and then weather permitting I would use my California Duster on the paint, and every time I stopped I would dust it again. I was always anal about my trucks, and because of that I was always rewarded with new trucks. I have been driving for 23 year, and in that time I have had 19 brand new trucks all of which had never been driven other than at the factory and around the sales lot. These have been just about even between Pete's and W900's maybe just a few more Pete's. I know these trucks like the back of my hand, inside, out side, top to bottom, all I have to do is think of a part and I can see it in my mind. -Mike
|
|
#16
08-12-2011, 07:51 PM
|
||||
|
||||
|
Howdy All!!!
Well today I think I lost it. I spent 6 hours building the radiator for the truck and the core of it won't even be easily seen. I used all but 1.5" of one 12 x 6 sheet of .010" styrene to build this. I first sent the sheet of styrene through my paper shredder to achieve several 9/32" wide strips. The strips came out with a slightly serrated edge which I left it gave quit a good effect. I then took some of the strips and chopped them up into 1/16" pieces. Then the fun began. I cut the other strips into pieces 2 1/4" long then welded 5 of the little piece to that then laid another strip on that and kept going from there till I had a core 1 1/4" high. ( I did this in two parts that is why the crooked line of the spacers  But I am not re-doing it.) But I am not re-doing it.)Then I built a fan shroud for it, and a top and bottom tank with the hose connection. (Bottom hose connection not shown in pictures) Now You have to look just right to see the core in the shroud and I am now going to build another one slightly narrower for the charge air cooler. So therefore when that is done you won't even be able to see the core on the radiator, but hey at least I know it's there and accurate, and now you all do as well..     -Mike
|
|
#17
08-12-2011, 07:52 PM
|
||||
|
||||
|
Well today I received an envelope from Lynn. (tc1cat)
I asked him to make me basically a brass washer 1/2" in diameter with a 2-56 hole in it. I needed this part to finish the air-to-air on the motor. Well with out pause Lynn got them made and to me. So today I got the air-to-air all but finished, I still need to build the core for the cooler it self, I got to wait till Friday when I can get to the hobby shop and get some .010 x .156" strips. (Two paper shredders but they both shred at 1/4") I got the case made last night. I got the mail today at 3pm and had this completed by 4:30.      Lets see if anyone can explain this. Look in the last picture of the front of the engine looking in the end of the hood. Now look at the distance between the frame rail and the hood on both sides. The right side of the hood is closer to the frame rail, which means the hood is not sitting right. Now I have taken a straight edge and went from back of cab to the end of the hood on both sides and measured the gap at the point where the hood meets the cab. I get exactly the same measurement on both sides. I have measured the hood standing on end at the same locations on both sides of the hood and get exactly the same measurements. I have measured the new cowling where the hood meets it on both sides and get exactly the same measurement. I have taken a straight edge and placed it next to both frame rails and they are straight. I have measured under the cab from the same spot on both sides to the frame, Yup both the same also. No matter where I measure I come up with the same measurements on both sides of the truck, but the hood still don't fit square. If I move the hood over to where I got the same measurement at the front of the hood to frame then I have just slightly over a 32nd of an inch gap on the left side of the hood at the cowling. Anyone got any ideas? I also got the sleeper mounted finally. I made some L brackets out of brass and attached them on the outside of the frame using the top crossmember bolt and then attached them to the floor supports on the floor of the sleeper. Just like they did the old rigid mounted sleepers. I then got the stacks remounted with the mounts in the proper locations and used some aluminum cone washers as the spacers. It's hard to see in this picture but the stacks are flush on the outside with the side of the sleeper, and this time they are actually straight both up and down and front to back. Of course it is a good thing you can't see the part of the stack where the holes go. **** it only took me drilling 4 sets of holes to get it right.. Well 5 sets if you count the first ones I drilled. I must have been brain dead but the way I drilled the first holes, well lets put it like this. I could use them holes to mount the pipes to the front of the sleeper. -Mike
|
|
#18
08-12-2011, 07:53 PM
|
||||
|
||||
|
Ok just figured out the hood problem. I actually looked at my pictures and saw it. The front of the hood is crooked. When I set it on a flat surface I get the same measurements on both sides form the ground up but when I take the straight edge and place it next to the hood I have a gap of almost a 16th at the top on the left side and at the bottom on the right side.
So how do I go about fixing that? -Mike
|
|
#19
08-12-2011, 07:54 PM
|
||||
|
||||
|
good to see you back Mike ! The truck is looking great and the detail is nice i like the drink holder between the seats. I think your truck will be bad azzz when your done !
__________________
SHANE... Member of the Central Plains Mini Truckers..
|
|
#20
08-12-2011, 07:54 PM
|
||||
|
||||
|
Hi All!!
Been a long weekend. I got off Friday night at 11pm got home at 11:30 then had to put on the awesome little items I got in the mail that morning from Lynn. I got to bed at 5:30am and then got up at 8am and helped my brother move all day. I got home from that at 10pm and commenced to working on the truck till 7:30am at which time I went to bed, just to get woke up at 10am to go help the brother more. It is now 11:15pm and I am sitting here trying to catch up on the forum and then get some updates done. So here we go. Thursday I got a package from New Zealand that contained my front suspension. This is the one thing I was needing to get the fenders made and the hood attached. Then Friday morning I got a package from Lynn containing the mirrors I asked him to build for me. First the mirrors.. THANK YOU LYNN what can I say, I sent him a drawing of what I wanted along with a 1:1 picture and he sent me perfection. I could not be happier.     In the above picture if you look at the blind spot mirror, I asked Lynn to make them convex so that I could polish them and then they would look like the real thing. Well I got an email back from Lynn saying that he was going to make them a little different than I originally wanted because on the 1:1 mirrors you can clearly see that the mirror is held in the case by a rubber gasket. So he was going to make them just like the 1:1's. Well I got the mirrors, they consisted of the case and the mirror insert. So that when I put them together they look like the mirror is inside the case.. Because they are.... Sorry I don't have any pictures of one completed yet but here is a picture that Lynn sent me when he was building them. ~Mike~
__________________
To view links or images in signatures your post count must be 10 or greater. You currently have 0 posts. Mike "DREAMWEAVER" Johnson To view links or images in signatures your post count must be 10 or greater. You currently have 0 posts. RIP FreddyGearDrive 2-12-59/12-19-11 Rims and Tanks by ihbuilder / Grill and Visor by Brian in PA / Mirrors, Front and Rear Bumper, Back of Cab Lights, and Steering Arms by tc1cat / Fenders by Stylin n Profilin / Frame Rails by The Late Freddy Gear Drive Last edited by Dreamweaver; 11-11-2011 at 01:20 AM.
|
|
| Currently Active Users Viewing This Thread: 1 (0 members and 1 guests) | |
|
|


 Linear Mode

