|
#41
 09-05-2017, 11:46 PM
|
|||
|
|||
|
Anyhow, back to what I was saying. This Polish hillbilly redneck can ONLY use 4 fingers to type with. I use 2 from each hand. The rest just seem to get in the way, & cause even more typo's then I already make.
On a positive note, When the printer ran out, & parts was incomplete this morning. it gave me a good reference for cleaning up the hex inserts in the other rims. So far, mess ups included.......between the front loader, & Mack conversion, I've got over 100 hours of 3D print time invested. ONLY about 65 is for the usable parts, & there's approximately 20-30 more hours left to go. ALL the parts for the front loader conversion are printed. Those, along with the Mack parts all need to go through the final clean ups before they are ready to use. I've been told that our workload should slow down at the end of this month, or shortly after the first of next month. I, for once am anxious for the slow down. I FINALLY have enough projects in the garage to keep my mind occupied, & stay busy for the long slow winter to come! On a separate note, the wildfires here in WA state are producing so much ash & smoke, eyes are itchy, & watery. When I awoke this morning to start the car it was lightly dusted with ash. Wish I had time to take pics.....Even if I did, it was dark out & not much would have showed up with my crappy camera phone. I did, however think to snap this pic today at work. This snap was taken this morning, 9-5-17 at around 8:15AM from the worksite in Des Moines WA, looking due east into the morning sun. There's so much smoky haze, that I was looking directly into the sun while this snap was taken  20170905_081816 by Anthony Kalnoski, on Flickr 20170905_081816 by Anthony Kalnoski, on Flickr

|
|
#42
09-06-2017, 09:37 PM
|
|||
|
|||
 ONLY 2 more parts to print, & the 3D printing for the Bruder Mack truck, & Bruder Liebherr 574 front loader will be completely printed! ONLY 2 more parts to print, & the 3D printing for the Bruder Mack truck, & Bruder Liebherr 574 front loader will be completely printed!  I'll have to post pics of the whole lot together, BEFORE they are cleaned up for assembly. I'll have to post pics of the whole lot together, BEFORE they are cleaned up for assembly.
|
|
#43
09-06-2017, 10:04 PM
|
||||
|
||||
|
Looks like a heck of a fire! I'd probably be asking around if they need help digging firebreaks.
Glad the parts are coming together. Stay safe up there.
__________________
What do ya mean "Cars are neither Trucks or Construction"? It's still scale, and i play fairly well with others, most of the time...
|
|
#44
09-06-2017, 11:19 PM
|
|||
|
|||
|
Quote:
 The closest to me is approximately a 2 hour drive away, or an hour as the crow flies, & is burning away from me. I just have to deal with the smoke, & the ash fallout. The area it's in is mainly vacation cabins, & unpopulated. I feel for those that have assets in that are that are being turned to ashes. It's been a rough fire season this year. First time in a very long time I can remember fires of this magnitude West of the Rocky Mountains, in Wa State. The closest to me is approximately a 2 hour drive away, or an hour as the crow flies, & is burning away from me. I just have to deal with the smoke, & the ash fallout. The area it's in is mainly vacation cabins, & unpopulated. I feel for those that have assets in that are that are being turned to ashes. It's been a rough fire season this year. First time in a very long time I can remember fires of this magnitude West of the Rocky Mountains, in Wa State.  I'm glad the parts are almost all printed as well. I know this winter I'll appreciate that I did them ahead of time, rather then waiting impatiently for them to get outta the printer. I'll be even more glad, once I have tinkered with it a bit more, & have a better grasp with CAD!
|
|
#45
09-07-2017, 11:05 PM
|
|||
|
|||
|
D@M IT!
 I though I was almost done with 3D part printing for a bit......................................BUT...... .............When I checked them out, the Front Body for the front loader had warped a bit. The holes in it DIDN'T match with the template holes I though I was almost done with 3D part printing for a bit......................................BUT...... .............When I checked them out, the Front Body for the front loader had warped a bit. The holes in it DIDN'T match with the template holes SO....I cranked up the heated print bed more, added a larger diameter raft, & try AGAIN SO....I cranked up the heated print bed more, added a larger diameter raft, & try AGAINI tinkered with the servo mounting system that will drive the D11 today. I WANTED to use the BLUE one, but it was too big to fit inside against the back wall of the dozer.  http://www.ebay.com/itm/Redcat-Blue-...72.m2749.l2649 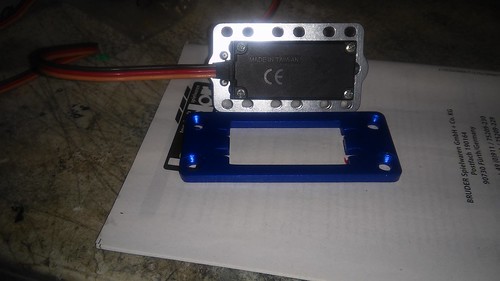 20170907_190102 by Anthony Kalnoski, on Flickr 20170907_190102 by Anthony Kalnoski, on FlickrInstead, I used some that I had previously purchased from robotshop.com, OR was it ServoCity.com..........IDK, can't remember right now. 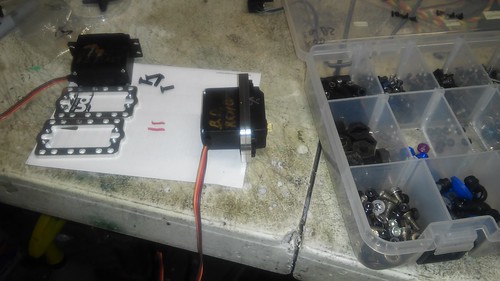 20170907_185648 by Anthony Kalnoski, on Flickr 20170907_185648 by Anthony Kalnoski, on FlickrThat's a METAL gear Savox servo there. I had a few that were bad. The potentiometers went bad in them. they WOULDN'T move at all. I disassembled them, removed the pottent, & the motors still worked. Now I'll have to use a Sabertooth 2X5 to run them. that's alright, I got a few on hand here. I may also need to add another mount plate to those 2, to get the drive sprocket in the right position with the tracks. I used 2, & put them together with M3X8mm countersunk screws.  Yeah, I know buttonhead screws are more typical for this, but I didn't want them protruding too far out, so went this route. 20170907_185648 by Anthony Kalnoski, on Flickr Yeah, I know buttonhead screws are more typical for this, but I didn't want them protruding too far out, so went this route. 20170907_185648 by Anthony Kalnoski, on FlickrHere's some pics of the latest company acquisition, an ERTL 1:16 log skidder. She's in rough shape now, & needs a bit of work from the 3D printer before she's ready for work. You know how them @sshats with the Department of Labor & Industries are, safety this, safer that. Personally I kind of like it WITHOUT the top! It fits right in around here, with our Polish hilbilly redneck equipment. 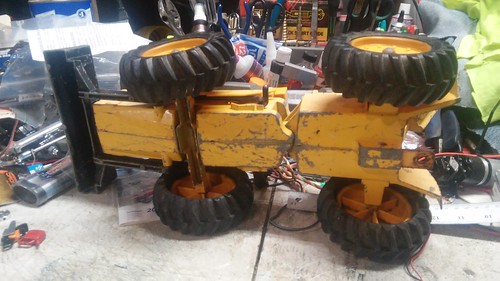 20170907_161017 by Anthony Kalnoski, on Flickr 20170907_161017 by Anthony Kalnoski, on Flickr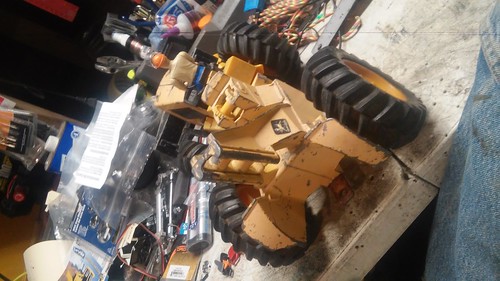 20170907_160945 by Anthony Kalnoski, on Flickr 20170907_160945 by Anthony Kalnoski, on Flickr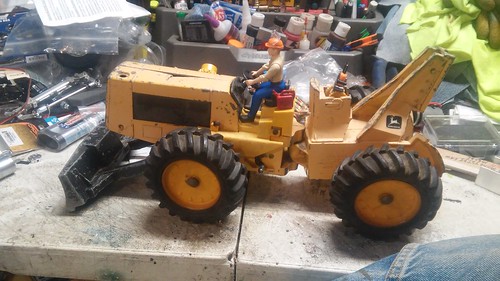 20170907_155756 by Anthony Kalnoski, on Flickr 20170907_155756 by Anthony Kalnoski, on FlickrI'm thinking a 3D printed cab, 4 new tires, & rims too. The tires aren't that bad, but I don't think they'll be good once separated from the beat up, cracked, & broken rims that are on it now................... IDK, still on the fence about this project. I may just toss it........not sure yet. IDK how I can make the NON motorized winch on the *** end function as it needs to for an RC skidder. Also I know a solution for the drive, but it would ONLY be 2WD. Figuring out a front drive system...............................may be hard to do.
|
|
#46
09-07-2017, 11:12 PM
|
|||
|
|||
|
I ALMOST
 forgot to post the pics of the cheap Chinese excavator I FINALLY remembered to take a pic of it. I think with 4 new Firgeli actuators it'll work well enough for this outfit. It's not quite scale in the cab area.......................perhaps once I get a grip on CAD I can make one that's more suitable to scale. forgot to post the pics of the cheap Chinese excavator I FINALLY remembered to take a pic of it. I think with 4 new Firgeli actuators it'll work well enough for this outfit. It's not quite scale in the cab area.......................perhaps once I get a grip on CAD I can make one that's more suitable to scale. 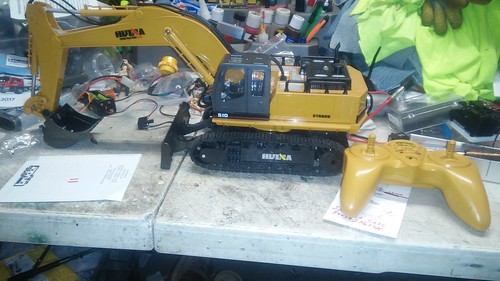 20170907_190749 by Anthony Kalnoski, on Flickr 20170907_190749 by Anthony Kalnoski, on Flickr
|
|
#47
09-07-2017, 11:28 PM
|
|||
|
|||
 One final comment before I turn in for the night. PLA sticks better to the build plate (Well, in my experience, with my XYZ Pro 3D printer) than does ABS. I'm not sure why. Anyone that's more experienced with 3D printing know why? The ABS, & the PLA parts I've printed have ALL been printed on the same bed tape, same rafts, (actually with the PLA I found it's not necessary for rafting, nor a heated print bed) same supports, same temps, & identical printer settings. Actually I even tried turning up the temp(s) a bit with the ABS, & haven't been able to make it adhere as well to the printbed as the PLA. One final comment before I turn in for the night. PLA sticks better to the build plate (Well, in my experience, with my XYZ Pro 3D printer) than does ABS. I'm not sure why. Anyone that's more experienced with 3D printing know why? The ABS, & the PLA parts I've printed have ALL been printed on the same bed tape, same rafts, (actually with the PLA I found it's not necessary for rafting, nor a heated print bed) same supports, same temps, & identical printer settings. Actually I even tried turning up the temp(s) a bit with the ABS, & haven't been able to make it adhere as well to the printbed as the PLA.
Last edited by skeeter; 09-08-2017 at 12:05 AM. Reason: typo
|
|
#48
09-08-2017, 06:55 AM
|
||||
|
||||
|
Who dropped a tree across the skidders hood?
Skidder winch, still have any more broken servos? Make drum, mount to servo. Wrap fake drum with same cable you use, mount servo and drum below body. Since it's articulated, why not do a 4 motor, 2 esc setup like steinhdans bruder loader conversion with the 3d printer files? Can the model pass for the early ones that had no roof or ROPS? From back when your operating position was a steel seat on a spring because "why are you whining? the rest of the crew doesn't even get to sit!"
__________________
What do ya mean "Cars are neither Trucks or Construction"? It's still scale, and i play fairly well with others, most of the time...
|
|
#49
09-09-2017, 12:35 AM
|
|||
|
|||
|
Quote:
ALWAYS have broken servo's laying around. NEVER know if/when can use a part from a busted one to resuscitate life back into one that recently took a dump. I LIKE you'r idea for the winch, & shall go that route.The front drive, I don't believe is friendly (space wise) to doing that with it. I'll have to look at it again. I don't think there's enough room to place the motors in it, without some serious fabrication work to the pot metal. I'd do it now(look at it & see)......but after a 13 hour shift, PLUS morons playing bumper cars & CLOSING the freeway for my commute home, OH, AND couple that with traffic for the State Fair  ") .................I'm calling it a day. .................I'm calling it a day. I think she's a bit too new of iron for the good ole days set up. No title on the old heap, got it for scrap price, but I'm guessing early to mid 80's model. Ya know, the more I  about it, the more I think I may be able to do a set up like Stein used for his loader for this....................IF I cheat the tubing & place the pivot mount hole very near the top of axle about it, the more I think I may be able to do a set up like Stein used for his loader for this....................IF I cheat the tubing & place the pivot mount hole very near the top of axle Frizzen, I could give you a great big ole kiss right now! you're a freaking GENIUS, or I'm a dumb@ss for NOT visualizing that. ESPECIALLY since I have a build in the works of a loader that uses that very system on it! I need to think OUTSIDE the box more often. I got so use to Traxxas & the OEM parts, couple that with newish to figuring out ways to convert things that aren't READILY available in the RC world
|
|
#50
09-09-2017, 01:19 AM
|
||||
|
||||
|
You've seen what stuff i build. Can't think inside the box, it was thrown away like 30+ years before i was born!
Servo winches work in my crane, and most of the smaller cable machines on the site. Either hack the stock board or get a baby esc. I'd just use the stock drum location as a pulley to drop the line to the hidden drum. I'd just get some square or rectangle brass stock and solder, just make an ugly simple ROPS, maybe slap a roof on top that's not quite square. A tree fell on it busted up the cab and hood, the welder just cut off the mangled original and 'bubba-ed' this together to finish work before the cutting permit expired. Do you want original, or personality? Makes it look mean. A lived in world with some grime is more interesting to look at than where everything is new and box stock. Perfect and new have their place, but if it works for a living it's not a trailer queen.
__________________
What do ya mean "Cars are neither Trucks or Construction"? It's still scale, and i play fairly well with others, most of the time...
|
|
#51
09-09-2017, 05:29 PM
|
|||
|
|||
|
Yeppers, I concur. Stuff that has some character is better than shiny new stuff. It's also more fun to build too.
I like the idea fir using the existing winch drum as an additional fairlead, & will be going that route with this project, as well as the idea of the cab too. Once I get done waiting in line at the Department of Vehicle Licensing, (long story.......sold brother a vehicle 2 years ago, he lost the title. I acquired the necessary paperwork so he could Xfer it 3 days ago. I misplace it, so I'm back AGAIN, waiting in the hour plus long lines) I'm going to double check the front axle & see if I can skeeterfy a front drive system, soon as I get home. I FULLY concur with the work isn't a trailer queen. I find it funny, some people at work, they keep the inside of their work trucks looking as they did on the dealership showroom floor. It's a frigen WORK truck, NOT a show truck, or a brand spanking new truck! LOL!
|
|
#53
09-10-2017, 09:45 AM
|
|||
|
|||
|
Between Friday, & Saturday's mail, I got a truck load of packages delivered me. Time for some pics!
As we all know  As threatened, here's ALL the 3D printed parts for the ALL PLASTIC Bruder Mack conversion. One front tire has the bearing installed in it already. 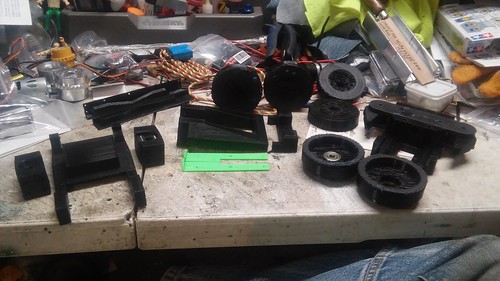 20170909_165352 by Anthony Kalnoski, on Flickr 20170909_165352 by Anthony Kalnoski, on FlickrHere's the lucky candidate that's been selected for the conversion. The dump box on it is much LONGER then the other Mack conversion I've in the works. 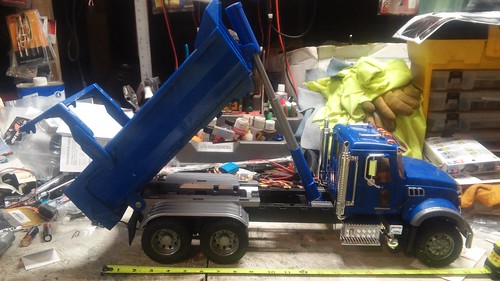 20170909_173008 by Anthony Kalnoski, on Flickr 20170909_173008 by Anthony Kalnoski, on FlickrMAGOM HRC delivered me some parts for the D11. They DON'T offer ALL the parts for us self conversion types, but will throw us a bone.............................WELL, that's what I thought anyways! I ordered the Conversion hubs for the stock Bruder track sprockets. When I installed them, I noticed that I DON'T have a motor with a large enough shaft to fit them. Even the 4 or 5mm shafts of gear motors WON'T fill that hole. 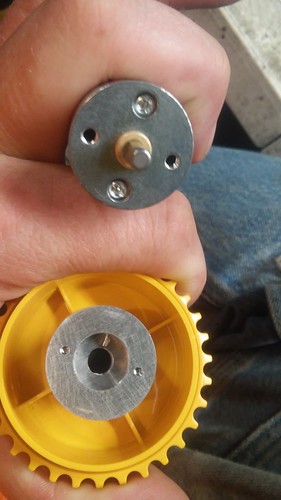 20170908_205236 by Anthony Kalnoski, on Flickr 20170908_205236 by Anthony Kalnoski, on FlickrHere's a pic to show the gear motor shaft sixe, & the diameter of the motor mount hole in Mr Magom's mount. 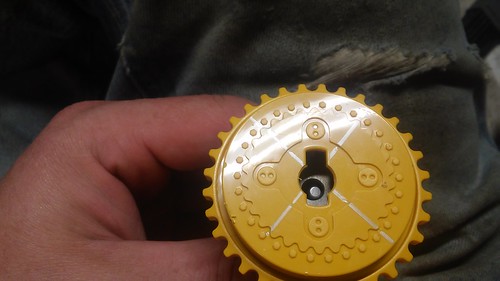 20170908_205334 by Anthony Kalnoski, on Flickr 20170908_205334 by Anthony Kalnoski, on FlickrLuckily for me, I've learned to NEVER order only the parts I (THINK) need, but order back up plans with th em as well. So here's the back up plan. Magom aluminum D11 drive sprockets. They are suppose to mount to a continuous servo. All the servo adaptors I have (Sorry I forgot to snap pics of this part ) won't match up with the holes. That's alright, I think I may have found a work around, with my Polish Hilbilly Redneck engineering! It's only about 1mm each side that the holes are off. Rather then have holes in the servo adapter, I'll have slots. Simple as just dremmeling into the holes with cutoff saw to make them slots.  20170908_204124 by Anthony Kalnoski, on Flickr 20170908_204124 by Anthony Kalnoski, on FlickrWell, that's all the time I have for now. I've got to run to the brotyhers place, & hand off that release of interest...................BEFORE I missplace that d@m thing AGAIN.
|
|
#54
09-10-2017, 09:51 AM
|
|||
|
|||
|
F@#k me running! I spent over an hour, hunting & pecking out that message with this d@m keyboard, & thought I was careful to double check it, ONLY to hit post, & find typos
|
|
#55
09-10-2017, 11:02 PM
|
|||
|
|||
|
To keep this thread from being
Here's the pics I forgot to snap the other day. Here's the Servo hub, after I modified it to work with the Magom D11 aluminum drive sprocket. Also a pic without the second screw installed, to HOPEFULLY show the distance that the 3mm screw holes are off from working with this servo hub as it comes from the factory. In the pic with one screw installed, the servo hub has been pushed all the way to where it WOULD have set, had I not modified the holes to make em work. 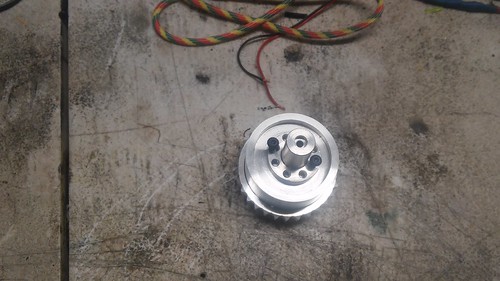 20170910_192648 by Anthony Kalnoski, on Flickr 20170910_192648 by Anthony Kalnoski, on Flickr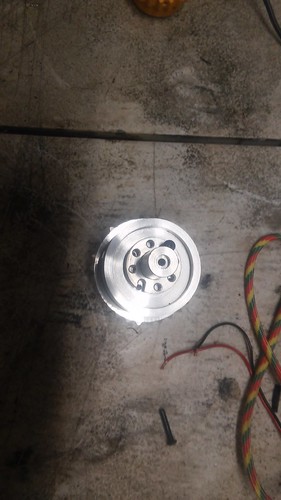 20170910_192721 by Anthony Kalnoski, on Flickr 20170910_192721 by Anthony Kalnoski, on Flickr
Last edited by skeeter; 09-10-2017 at 11:04 PM. Reason: wrong pics included
|
|
#56
09-18-2017, 11:00 PM
|
|||
|
|||
|
I've been busy working like there's no tomorrow lately. Today, due to a massive rain storm, work let out early.
I put the time to good use tinkering in the garage, & worked on the Bruder D5 conversion a bit. Here's the idea for the new drive sprocket mounts I came up with. I'm awaiting parts to mount them to the servo's 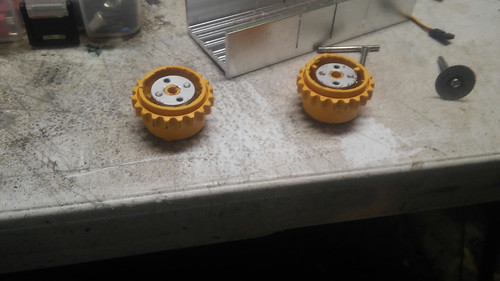 unnamed by Anthony Kalnoski, on Flickr unnamed by Anthony Kalnoski, on FlickrThis is the idea I've borrowed for the updated drive motors. They WEREN'T continuous servos, so I had to modify them so they would be. I chose this servo because it's got a 25 tooth spline, & I can readily buy servo mounts that fit it. 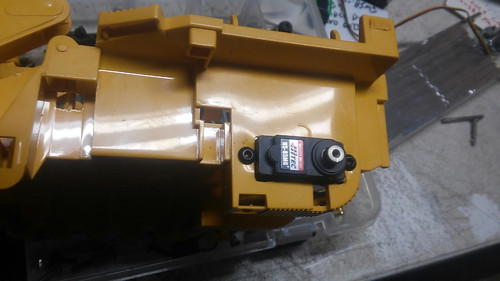 unnamed (1) by Anthony Kalnoski, on Flickr unnamed (1) by Anthony Kalnoski, on Flickr
|
|
#57
09-18-2017, 11:15 PM
|
|||
|
|||
|
One more pic, showin how much material was trimmed from the original drive sprockets. 11.62mm, according to the cheap harbor freight digital caliper I've got. I trimmed it with a 24TPI hobby saw. It wouldn't fit into the miter box I've got, so I free handed it.
 unnamed (2) by Anthony Kalnoski, on Flickr unnamed (2) by Anthony Kalnoski, on FlickrI used a hole ream bit to enlarge the center hole of these 25tooth servo hubs. i enlarged them just enough that they would pass over the hole. Once they were large enough, I used RED locktite to insert 2 screws in them. I placed the screws into the sprocket, & attached the hub to the sprocket with epoxy. These sprockets should be better centered than the previous attempt. After the epoxy had dried, i used a 15/64 drill bit to make the hole of the drive sprocket large enough that a 3mm button head screw could pass through the center. I DIDN'T have a 6mm drill bit, so I used what I had that would do the job.  I had to forego power tools for this, as this made the walls really thin! I hand drilled them, then fitted the servo hub back onto it. HOPEFULLY once the other parts arrive, & I can put ti together, it'll function as intended! I had to forego power tools for this, as this made the walls really thin! I hand drilled them, then fitted the servo hub back onto it. HOPEFULLY once the other parts arrive, & I can put ti together, it'll function as intended!
|
|
#58
09-19-2017, 10:18 PM
|
|||
|
|||
|
I got home today, & had a metric tone of parts awaiting me from www.robotshop.com !
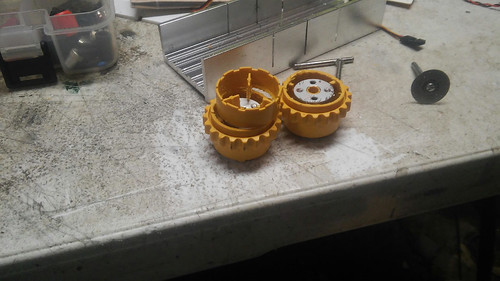
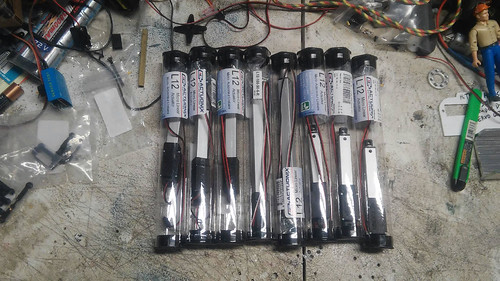
I didn't have much time to tinker tonight, but I did do a little bit. I got the D11, & D5 drive sprockets mounted to their servo hubs. On the D11, I had to enlarge the holes to 4.5mm, so I could make them mount to Mr Magom's drive sprockets. 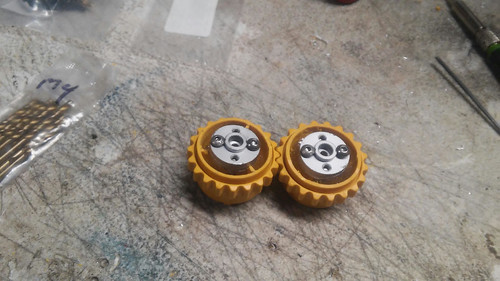 unnamed (3) by Anthony Kalnoski, on Flickr unnamed (3) by Anthony Kalnoski, on Flickr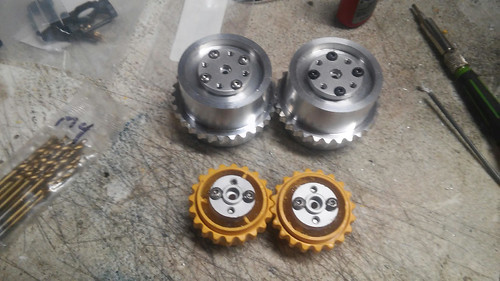 unnamed (5) by Anthony Kalnoski, on Flickr unnamed (5) by Anthony Kalnoski, on FlickrShowing the Polish Hillybilly Redneck engineering I used to make the hubs mount to Mr Magon's drive sprockets.  unnamed (4) by Anthony Kalnoski, on Flickr unnamed (4) by Anthony Kalnoski, on Flickr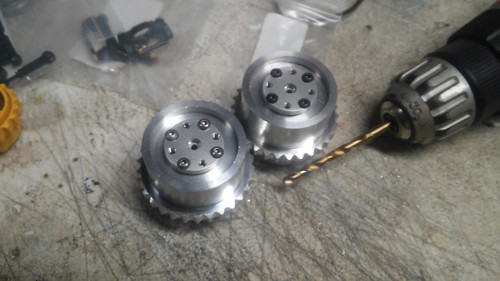 unnamed (6) by Anthony Kalnoski, on Flickr unnamed (6) by Anthony Kalnoski, on FlickrALSO, there were a bunch of fergeli actuators that are for varying proects. The Bruder front loader conversion will get 3, the D11 will get the 2 large ones, & the remaining will be used for the Hunya excavator improvements. I had a brain fart, & FORGOT to order the PROPER amount for the excavator, SO................I'll have to order one more to be able to do that project.
|
|
#59
09-19-2017, 11:30 PM
|
|||
|
|||
|
I left in a hurry for it was dinner time. I forgot to post the pics of all the actuators that came today. There's so much work here, my shop foreman, seen in the upper right hand corner, had a fit like a 2 year old, slithering on the floor, laughing, then crying, then cursing, & throwing things. It was a sight to see.
 unnamed (7) by Anthony Kalnoski, on Flickr unnamed (7) by Anthony Kalnoski, on Flickr
|
|
#60
09-20-2017, 10:03 PM
|
|||
|
|||
|
when I arrived home today, there was a box from www.servocity.com
I knew Ihad ordered it, but wasn't expecting it for a few more days. I noticed that with the previous D11 servo hubs, I had a slight rubbing issue. The mounting screws lightly rubbed on the (MODIFIED) continuous servo. The new servo horns are slightly diffent from the ones I installed yesterday. 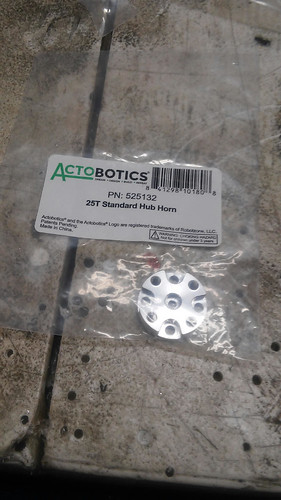 unnamed (8) by Anthony Kalnoski, on Flickr unnamed (8) by Anthony Kalnoski, on FlickrThe NEW servo horns installed. I still had to slightly enlarge the mounting holes in them, but NOT as drastic as their predecessors. This time I used the dremmel (knock off cheap Harbor Freight) tool, & slightly elongated the holes. 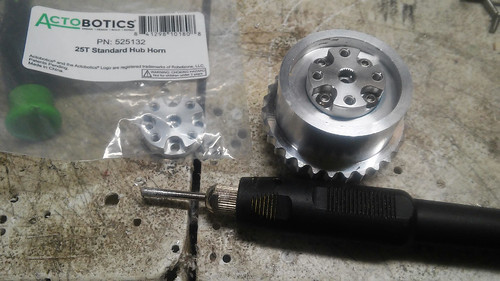 unnamed (9) by Anthony Kalnoski, on Flickr unnamed (9) by Anthony Kalnoski, on FlickrThe NEW horns, with the yesterdays version shown, 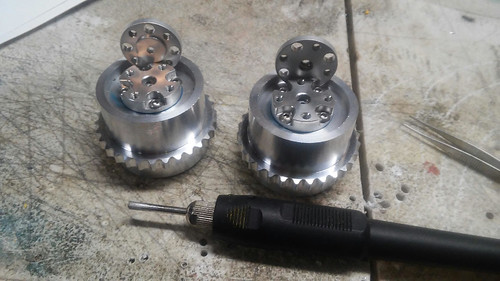 unnamed (10) by Anthony Kalnoski, on Flickr unnamed (10) by Anthony Kalnoski, on Flickr
|
 |
| Currently Active Users Viewing This Thread: 4 (0 members and 4 guests) | |
|
|


 Linear Mode

