|
|||||||
| Highway Trucks and Trailers On road trucks and trailers single and twin axle trucks. |
 |
|
|
Thread Tools | Display Modes |
|
#1
 08-19-2020, 12:24 PM
|
|||
|
|||
|
Ok time to start a new project. Since I cobbled together a Tonka dump truck conversion as my first attempt at RC construction I figured I needed a tractor trailer to ... well haul things so here we go this is the start and again I'm kind of experminiting with different ways to do stuff and this one will have lights.. woohoo.
 I plan on using a metal WPL running gear and cab but I'm going to sort of scratch build the chassis and stuff. I started with some 3/8 "U" channel that I got from HomeDepot or Lowes I don't remember which but I think they both have it. It's actually aluminum trim for the edge of 3/8 plywood cost less then $10 for a 4ft piece. The motor will be a 170rpm 57:1 gear motor, it's what I put in the dump truck and it will haul 5-6 lbs and I wanted to be able to pull at least that much weight around. It seems a little slow to me but I watch a ton of videos from Cabin Fever and such and it seems about the speed they cruise around at...as I progress I'll post more pictures.... Last edited by jerry56; 08-19-2020 at 09:12 PM. 
|
|
#2
08-19-2020, 06:10 PM
|
||||
|
||||
|
This should be fun to watch.
I've been wanting to do something similar with a 55 Tonka ford cab to pull the old pressed steel trailers. Think of the goal speed as like watching City driving as viewed from several stories up in a building. There's not too much need for highway speeds at the meets, and even when there is just keep right or pull over for faster traffic.
__________________
What do ya mean "Cars are neither Trucks or Construction"? It's still scale, and i play fairly well with others, most of the time...
|
|
#3
08-20-2020, 08:11 AM
|
|||
|
|||
|
OK....first all my builds are budget builds, I want folks that see these to know you can get into this hobby without spending $10,000.000...
I also try to build in a way that doesn't use 3D printers or milling machines or lathes because I don't have those and most people don't (well except for the 3D printer at under $200 I even I may have to break down and get one)... I try to use basic tools that anybody might have or can get without breaking the bank. Some builders here are really artists and I am in awe of their ability to build some incredible machines and love watching them progress...but getting started and drawing people to the hobby you have to start with the basics....so they see how to start and where they can go...so here we go Like I stated this will have WPL metal running gear, over the last year I've bought a couple WPL 4x4 and 6x6 trucks and use the parts from them to fill in for things I don't yet have the skill or equipment to make, for instance I used the 4x4 frame rails to keep my hole spacing for my front and rear axle mounts and mounting hole spacing for the transfer case. I bought the metal upgrade pieces since we already know the plastic will never hold up in a truck this size.  As you can see for now stock WPL wheels and tires I haven't found a cost effective alternative yet. I experimented with a little resin casting using an Alumalite kite from HobbyLobby, I wanted to make the frame spacers so I didn't have to buy them ...they came out ok but just wouldn't hold a screw, they just stripped out so....  Next I tried cutting up a nylon cutting board, this had mixed results I think my pilot hole was to small because they just split out on me Here's a front view of the resin cast pieces....meh...  So I decided since the frame rails were pretty solid I just need 3 points of support for this truck, front middle and rear, I cut and tapped a piece of aluminum bar stock from HomeDepot for the front and used some channel for a servo mount then used the WPL transfer case in the center and the WPL plastic piece for the rear.   Doing a test fit of the cab came out pretty good... You can buy these on Banggood for about $7 it's called a head unit..   The frame channel inside dimensions are smaller than the WPL so you have to file down the edges of the WPL pieces so they fit inside the frame rails.. Over all so far I'm happy with the way this one is going, I spent quite a bit of time trying different materials but I figured it was the best way to know what works and what doesn't either that or post dozens of questions asking will this work or that work....so I figure I'd try it first then if I get stuck I ask of suggestions....
|
|
#4
08-21-2020, 08:33 PM
|
||||
|
||||
|
It's nice to see more unique builds that don't need a machine shop.
For the first set of frame spacers, you could run a longer screw through both top and bottom sides of channel to either a nut or tap one side of frame. (Yes, use them to build a second truck...) You might also want to look at the WPL leaf spring upgrade kits that use real hangars and shackle.
__________________
What do ya mean "Cars are neither Trucks or Construction"? It's still scale, and i play fairly well with others, most of the time...
|
|
#5
08-22-2020, 07:57 AM
|
|||
|
|||
|
I haven't given up on the other spacers...yet... they probably have their place in a build I just need to see where that place is...
I have a set of the upgrade hangers and springs ( although the springs are the same beer can type metal) but I needed this truck lower than normal and adding the hangers gave me to much lift....as you will see...
|
|
#6
08-22-2020, 08:29 AM
|
|||
|
|||
|
Got some more done on this, my goal is a 40s/50s era looking tractor and trailer. I kind of want to focus on building older looking machines (not exclusively but mostly) so we have this one.
 Because of the first trailer I'm using I needed this truck to sit a little lower so I flip the axles to the top of the springs.. I think my next one instead of "U" channel I'll use "L" channel because I can't get my fingers inside the "U" channel to hold nuts and little bits and pieces. Anyway the body fits really well so far.  I had to open up the wheel wells because now the tires rub with it lowered, this is where I wish I had a way to use the Lego wheels they are about 4mm shorter and that's all I needed but this works and you can't really tell I opened them up. In this picture I still have the resin cast spacer bar, I have since ditched them and just taped a 3mm hole on the frame, this is where the "U" channel works better than the WPL pressed steel frame. time to mount the steering servo 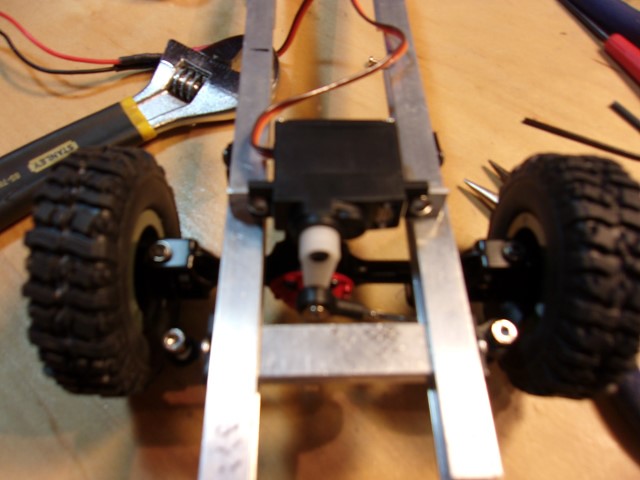 Pretty straight forward, I just notched a piece of "L" channel, drilled the mounting holes for the servo and then drilled and tapped two holes in the frame to the bracket. I had to tap the holes cause there was no way I was getting my fingers in there to hold a 3mm nut. in some places I super glued the nut to the inside of the frame so far they are holding. 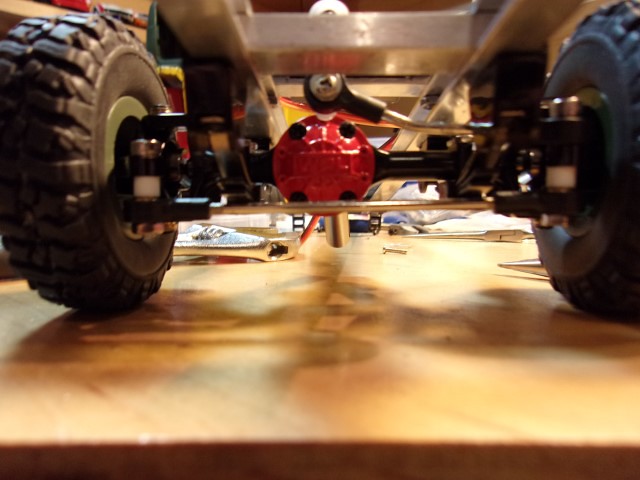 When I flipped the axles to the top of the springs it created problems with my steering the tie rods and were catching on the springs so I cut those 2 little white spacers from some plastic tubing I had laying around ( I save any plastic tubes from packing or whatever cause you just never know) this dropped the tie rod down below the springs an dit all works pretty good now. I need to find out what those black connectors on the servo are called so I can get some more of the really small ones my next build is going to need them. And since everything is literally coming on a VERY SLOW boat from china I try to plan two or three builds ahead. Another view from the top you can see the new aluminum bar stock to replace the resin cast. Here is the rear pretty straight forward I used the WPL rear bumper and frame spacer because it worked and was way easier than building something. Now I need to work on the fifth wheel and get a motor and transfer case mounted...
|
|
#7
08-25-2020, 08:33 AM
|
|||
|
|||
|
I feel like I got the height right now the wheel wells look stock-ish...
 [/url] [/url]Another view  This is the first trailer I want to use it's a one owner Wynadotte "Gray Line" moving van that I got as a child and have been carrying it around for 50+ years  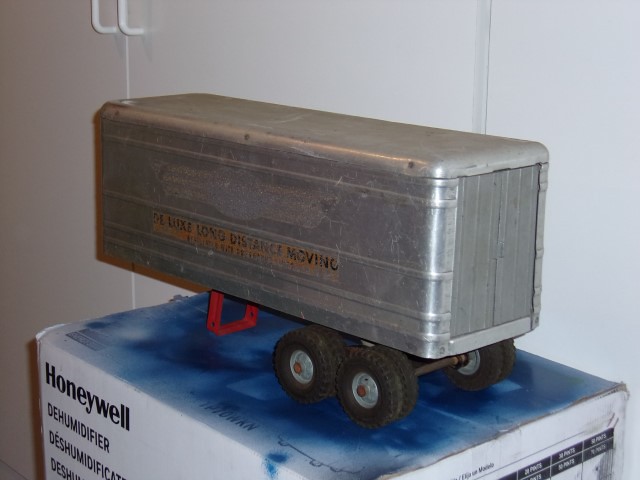  The WPLor JJRC cab looks smallish but then again the truck cabs back then were much smaller I think it will work. One project is a simple flat bed for it somewhere down the road.
|
|
#8
08-25-2020, 06:11 PM
|
||||
|
||||
|
You mentioned having a 3d printer, and the Lego tires, have you done a search on somewhere like Thingiverse for the rim options to adapt WPL / JJRC axles to those tires? Plus the logo are a street tread
That cab is a little small for the trailers, but it doesn't look bad. Maybe raise cab off frame a little. I'm really digging the Wynadotte trailer, i like the side door on those. Did it have wheeled landing gear?
__________________
What do ya mean "Cars are neither Trucks or Construction"? It's still scale, and i play fairly well with others, most of the time...
|
|
#9
08-26-2020, 03:52 PM
|
|||
|
|||
|
I don't have a 3D printer yet....but think it's one of the tools you kind of need for conversions,an Ender3 is about $210 so it's something I'm looking at. And yes I've looked on thingsiverse and have down loaded some of the wheel filesand a few other things of interest...kind of getting ready, plus I started dabbling on tinkercad to get a feel for it.
For now I'll probably just ignore the size difference in the truck and trailer when I build a flatbed it will be closer in scale.. Yes it did have wheels on the landing gear but they came off years ago. I got it for Christmas around 1959 or 60 if I remember right no idea what happened to the cab to it.
|
|
#10
08-28-2020, 07:21 AM
|
|||
|
|||
|
The transfer case just just WPL metal unit, the motor is a 57:1 gearbox motor from servocity 170-ish rpm I believe then I pot a red cat motor on it to give it a little extra omph. When you put the motor on the servocity gear box you have to trim off some of the motor shaft then swap the gear over, I haven't been able to find a tiny pinion gear to match those in the gear box so I swap them.
The whole thing fits up in the chassis I had to sand mine down on the edges cause it was a tad to tight.  After careful measuring I still mounted the transfer case to far forward.. and had to cut away a little more frame section and move it to the rear about 1/2 an inch. If I had used "L" channel I could have just drilled two more holesHere's another view I like the way it comes together even with my screw up  I'll get better at it....I hope...now I just have to get the fifth wheel on it...
|
|
#11
08-28-2020, 07:39 AM
|
|||
|
|||
|
I couldn't find a fifth wheel off the shelf that was the right scale so I went with a Tamiya unit. It's a little big but I just went with what I could get.
 I just got the fifth wheel but didn''t realize it didn't come with the mounting bracket so I just made one out of a 3/8 "L" from McMasters Carr..  Sorry for the blurry picture my camera didn't want to focus up this close Anyway, I just drilled the mounting holes in the brackets and top of the frame and tapped the frame cause there just wasn't enough room for me to get a nut on the back.  I wasn't thinking when I drilled the side mounting holes for the fifth wheel itself I should have tapped those as well....so I just super glued a nut to the inside cause there was no way I could get in there to hold the nut in place  Again after taking careful measurements and mounting the fifth wheel right over the rear axle the first time I tried the trailer on it ..... the trailer would bind against the back of the cab when you jackknifed it, the frame was about 1/2 to 3/4 inch too short.....sooooo So I had to move the fifth wheel back a 1/2 inch because I wasn't going to build a new frame at this point. Yeah I screwed up a few things on this one too but I hope to get better at it. To anybody starting out the aluminum it's super expensive it's just your time since all the components can move if you need to do the frame rails over I will probably do that in the future but for now I'll just press on...
|
|
#12
08-28-2020, 06:37 PM
|
||||
|
||||
|
That sucks, I was afraid the cab to trailer looked very close for things like turning and bridge transitions
It might be worth trying to slide the front axle mounts and cab forward instead of moving the 5th wheel aft past the axle. Just remember, if you make a series of evenly spaced mounting holes around the misdrilled and correct hole location it looks like you planned for the chassis having adjustibility. Same thing with extending the opening and putting a radius on all the corners around the t-case cut out. Looks like it's really coming together!
__________________
What do ya mean "Cars are neither Trucks or Construction"? It's still scale, and i play fairly well with others, most of the time...
|
|
#13
08-28-2020, 08:29 PM
|
|||
|
|||
|
In the pictures the fifth wheel is already moved back it's barely a 1/2 inch I'll know next time for now it's where it is.
When your building these there is a lot to take into consideration, some thing are obvious and others not so much. When I was mocking this up I thought I had enough room....now I know...It's like you have to get the right mindset going as your building these and I know after I build a few, I'll know what to watch for, and how the different pieces go together. I like that, if an extra hole looks bad....make a couple extra holes to even it out...lol... Yeah this one is getting close....I'd love to find some older body style trucks in 1/16 but I just haven't seen any...so I might have to concentrate on Tonkas ") or something.... or something.... 
|
|
#14
08-29-2020, 11:35 AM
|
||||
|
||||
|
This is a good thread showing all the little problems that pops up. Nice build.
Frizzen's idea of holes that look planned is a good one, but just in case you want to feel better about a swiss cheese look, here's my frame: https://imgur.com/ljK1lre About the servo connectors. If they're black, they're probably standard / universal / JR servo connectors. I don't think they have another name. They're basically shaved down versions of what's commonly known as 1x3 size dupont 2.54mm connectors. Same internal metal things, same general shape, but the Duponts are squared off. A kit containing various sizes is nice to have. I get a lot of use out of 1x1, 1x2 and 1x3 size.
|
|
#15
08-29-2020, 05:07 PM
|
|||
|
|||
|
LOL thanks Wombii I don't feel so bad about the holes now...
I didn't know they sold a "kit" of servo connectors... I'll look into those. I need to find an assortment of servo clevises too.... Yeah all kind of little things pop up some are pretty easy to work out others I sit and stare at it for a while until I figure it out.....
|
|
#16
08-30-2020, 08:21 PM
|
||||
|
||||
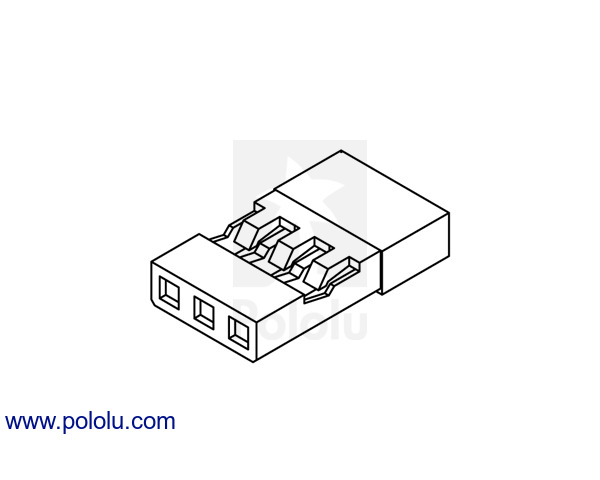 https://www.pololu.com/product/1924 here are standard servo connectors (male) 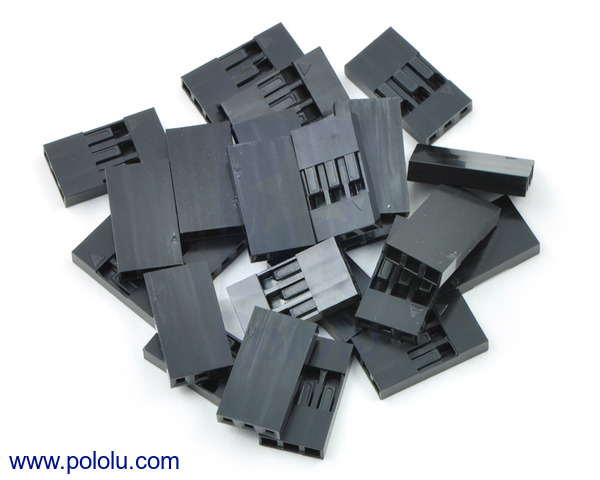 https://www.pololu.com/product/1902 and here are the 1x3 dupont housings. The servo connector housings are a bit slimmer to make it easier to plug into receivers. https://www.ebay.com/sch/i.html?_fro...t+kit&_sacat=0 Kits like these with dupont connectors of various sizes are less than 8 USD on ebay. You may also want to check out the pre-crimped "dupont jumper wires" that are very popular with arduino fans. You can easily tear off what you need from the ribbon cables and swap the 1x1 connector housings for 1x2 or 1x3. They usually come in 10/20/40 cm lengths and male-male, male-female and female-female types.
|
|
#17
08-31-2020, 04:41 PM
|
|||
|
|||
|
I can see a need for those for sure as I get more involved. Now I need to figure out what they call all those connectors for the servo horns you know the one that look like little tie rod ends I see people use a lot of different types.
|
|
#18
09-01-2020, 09:23 AM
|
|||
|
|||
|
Well this one is about wrapped up...I didn't take a lot of pictures of the lights well because they looked like a 4yr old went nuts with a glue gun...
so I'll give an overview without the horror of pictures.... the front head lights I wired together in series then paralleled them in with the front parking lights to one connector. Then ran the tail lights in parallel to another connector, then made a "Y" cable to connect the two circuits to the switch. I had more connectors than I wanted but since the cab comes off I wanted to be able to disconnect the lights and leave the electronics in the cab. I also painted the cab blue, not a great job though the texture of the JJRC cab is a rough texture and no matter how many times I primed and sanded the texture came thru... It felt smooth to the touch but not once it had paint on it....and the doors had some kind of contaminate on them cause I got fish eye on one and just a weird "swoosh" mark on the other... I got most of it out but it still looked sketchy ... but I went with it it looks good at twenty scale feet...
|
|
#19
09-01-2020, 09:36 AM
|
|||
|
|||
|
I cleaned up the trailer and polished the aluminum a little tried to get some of the major dents out of it, still needs a little work.... Glad I spend a few years working in a body shop...comes in handy...
 I drilled the parking lights out so the LEDs look like the set inside the little fake light housing they look pretty good...I need to find something to make a period bumper out of, I didn't like the M-35 style JJRC bumper. I thought about a popsicle stick or maybe a slat from a set of window blinds ( they would have to be cut down a lot though)  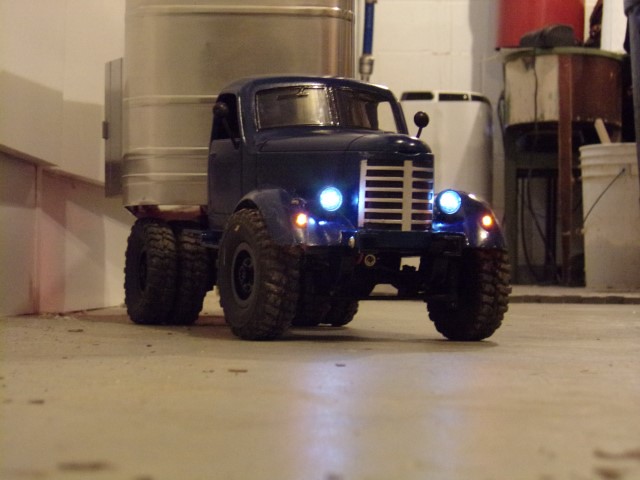 I want to order a set of original "Gray Line" decals for the trailer and think up something temporary for the landing legs ( unless it works) Since it is an older Wyandotte in pretty good shape I don't know how much I want to alter it, as much as restify it Over all it came out ok, I learned a lot, just need to finish up the bumper and some small details but it's mostly done.
|
|
#20
09-02-2020, 06:52 AM
|
||||
|
||||
|
That's becoming a sharp outfit!
I could see that with maybe like a white or cream bumper? With that type of landing gear, i'd probably want to put wheels back on, spring load it down, then run a servo inside the box to pull the lift cable. Then you could run that servo and some trailer lights off a plug back to your rx Check out 'gasoline alley toys' for box decals
__________________
What do ya mean "Cars are neither Trucks or Construction"? It's still scale, and i play fairly well with others, most of the time...
|
|
| Currently Active Users Viewing This Thread: 1 (0 members and 1 guests) | |
| Thread Tools | |
| Display Modes | |
|
|


 Linear Mode

